

Hello and welcome to the Around the World Blog Hop for February.
This month we are featuring Basic Essentials.

There is so much that I consider to be Basic Essentials. But...... I have been paper crafting for over 25 years now. As you can imagine stamps, ink, glue, scissors, paper trimmer and card stock are all basic essentials But I want to take it a step further for this challenge. I want to show what you can do with limited ink, paper, card stock and stamps. To show a layout that can be simply reproduced or paired back. I have given instructions below for those that do not own a Cut & Emboss machine, dies and embossing folders. With some tips on creating a circle to sit the bird on.
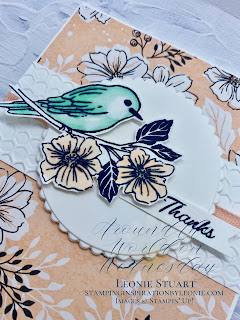
I am using a bundle from Sale-a Bration! called Friendly Hello. It includes the stamp set and Designer Series Paper.
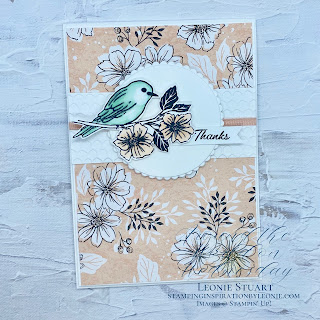
- Start with a Basic White card stock measuring 21cm x 14.8cm scored and folded in half
- Cut a piece of Basic White card stock to measure 10.2cm x 14.5cm
- Cut the Designer Series Paper to measure 10cm x 14.3cm and glue this to the Basic White piece measuring 10.2cm x 14.5cm. Then pop this up on the card base using Dimensionals. (You can skip the white layer and just adhere the DSP to the Card base)
- Cut a piece of Basic White to measure 10cm x 4cm Run this through your Cut & Emboss Machine using the Hive 3D embossing folder ( if you don't have a Cut & Emboss Machine you can just use a plain piece of card stock)
- Cut a 12cm length of the Petal Pink ribbon and adhere this to the centre of the Basic White layer using glue dots around the back ( If you don't have ribbon just leave plain or use another thin strip from the DSP)
- Glue the layer with the ribbon to the centre of the card front
- Cut a layering circle and layering scalloped circle from the layering circle dies in Basic White card stock and glue together before adhering to the card front using Dimensionals or glue (if you don't have these cut a circle by placing a glass on the card stock and drawing a circle then cutting with scissors)
- Stamp the Bird image in Memento™ Ink on Basic White card stock. Colour with Stampin' Blends and fussy cut ( If you don't have Stampin' Blends use whatever you have on hand or just leave the image uncoloured. It will still look striking)
- Adhere the bird image too the front of the layering circle using Dimensionals or Glue
- On a small piece of Basic White card stock stamp the sentiment. Trim with scissors and adhere to the card front using glue
Up next on this months blog hop is the talented and lovely Rochelle Laird-Smith.
Make sure you click on the next button below to continue with the hop.

Many thanks for stopping by. You are appreciated!

 |  | |||
 |  |  | ||
 |  |  |  |  |
")
")
 Cotton Ribbon Combo Pack")


Nothing like basic tips for creating the essential elements to a card. Love the tip for crating a circle with a glass if you don't have the amazing Layering Circles Dies. Thanks for sharing and for hopping around the world with us! x
ReplyDeletePretty card
ReplyDeleteLovely layout, Leonie. It's hard to go back to the true basics, isn't it?
ReplyDeleteSuch a pretty card, and you have used a great layout. I love these papers and stamps
ReplyDeleteLovely card and great tips
ReplyDeleteLove your card!!
ReplyDelete