Monday 28 November 2022

Stampers Showcase Blog Hop - The Holidays are Here!


Hello and welcome to the Stampers Showcase Blog Hop for November. 

This month we have "The Holidays are Here" as our theme. I was inspired by a card made by Tina Smith who's Instagram handle is @cardsandcoffeetime and blog cardsandcoffeetime.com. Go check out her amazing projects!

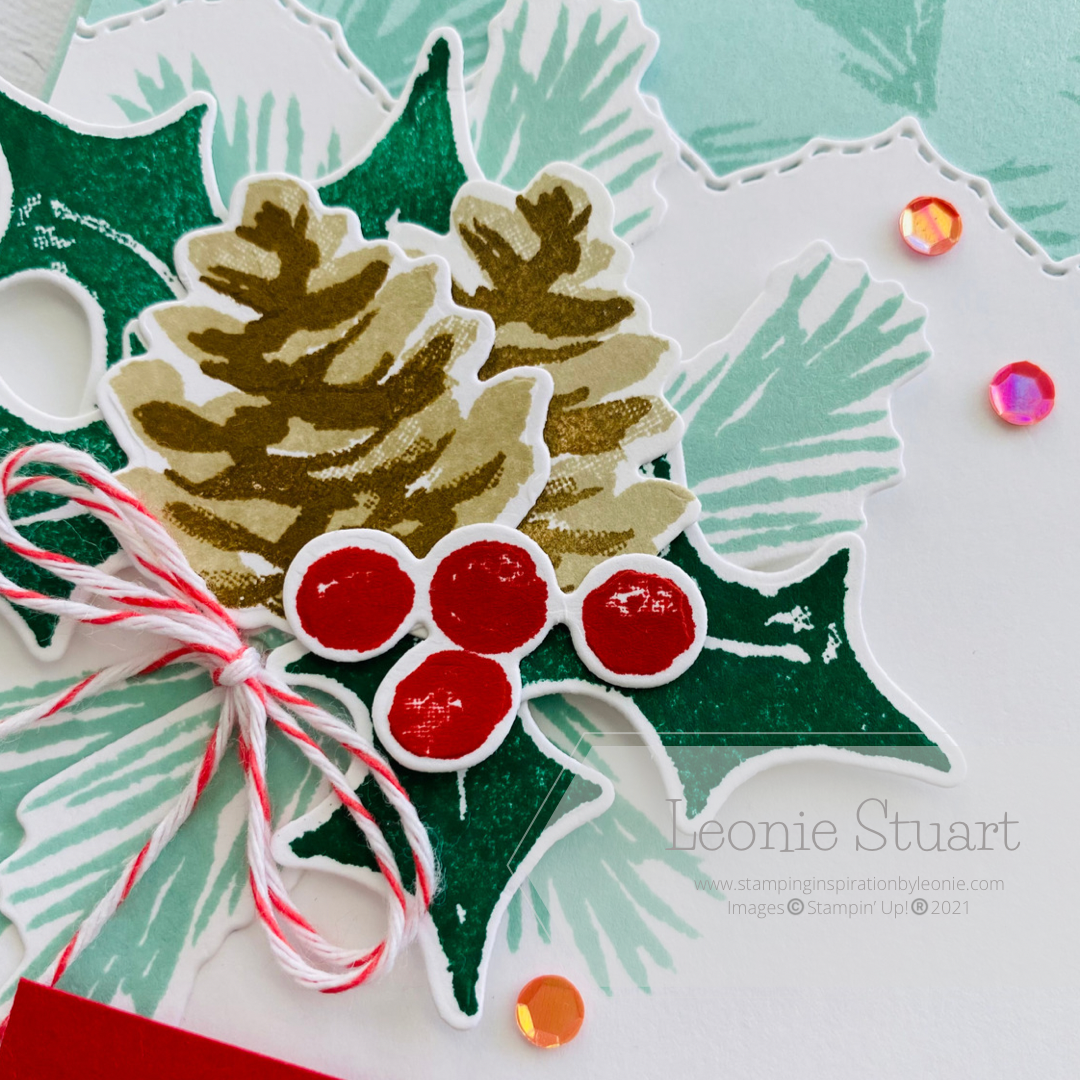
I have used the Christmas Season Bundle and teamed them with one of the Basic Borders Dies. I love the colours together for Christmas.


  1. Start with a Pool Party card base measuring 21cm x 14.9cm scored and folded in half
  2. Cut another piece of Pool Party to measure 10cm x 14.3cm. Stamp the pine leaves randomly in Pool Party ink on the top half
  3. Cut a piece of BASic White card stock to measure 10cm x 10cm and place the Border die along the top cutting the decorative edge . Glue this to the bottom pot the Pool Party layer and adhere to the card front using Dimensionals
  4. Stamp the Pine leaves in Pool Party ink on the Basic White die cut piece. Under where you will place the Pine Cones on the left hand side
  5. On Basic White card stock stamp 5 of the Holly leaves in Shaded Spruce ink, 3 of the Pine Leaves in Pool Party ink and the berries in Real Red ink. Stamp the 2 two toned Pine Cones in Crumb Cake and Soft Suede ink. Die cut all images with the coordinating dies
  6. Arrange die cut pieces then adhere to the card front using Dimensionals and glue for the berries
  7. Secure three of the Sweet Sorbet Adhesive Backed Seasonal Sequins around pine cones
  8. Stamp the Sentiment in Versamark™ ink on a piece of Real Red card stock . Sprinkle white embossing powder and set with the heat tool. Use trimmer to trim sentiment to 7.8cm x 1.5cm. Adhere the sentiment to the card front using Dimensionals
  9. Secure three of the Sweet Sorbet Adhesive Backed Seasonal Sequins around pine cones
  10. Tie a 20cm length of Sweet Sorbet Bakers Twine in a double bow and secure to the bottom of the Pine Cones using glue


  11. To head to the next blog please click on the link below. Make sure you check out everyones gorgeous projects this month.


    Thank you for visiting my bog today!!

    Have a great week.


Product List
Heat Tool
[129056]
$53.00
Paper Snips
[103579]
$19.25

Wednesday 23 November 2022

Colour INKspiration #134


Hello and welcome to the Colour INKspiration #134 Challenge.

Twice a month the crew get together to create to a colour palette inspired by an image chosen by a crew team member. This months image below was chosen by lovely crew member Cheryl Miller. What a beautiful image!


The crew would love you to join us for one of the challenges! It's so easy. Firstly, get some INKspiration by checking out all of the creations of the Colour INKspiration Crew in the challenge album on our Facebook page. Then you have 12 days from today to make and upload your creation to the Facebook Colour INKspiration Group. You don't have to have a blog to participate but if you do you can link back to your post. Make sure you use all of the challenge colours. You can also use neutrals such as Whisper White, Very Vanilla, Crumb Cake, Sahara Sand and Basic Black as well as Metallics. 

Not a member of the Colour INKspiration Facebook group yet? Just click here and ask to join Colour INKspiration, add the group to your favourites and share it with your crafty friends so they can join in the fun too. Make sure that you answer the joining questions. We can't wait to see what you create with 
these gorgeous colours.

I decided to make a simple Christmas Card sung the challenge colours and the Merriest Moments Stamp Set. I really like the colour combination for a Christmas card.


  1. Start with a Sweet Sorbet card base measuring 21cm x 14.9cm scored and folded in half
  2. Cut another piece of Sweet Sorbet card stock to measure 9.5cm x 14.8cm
  3. Cut a piece of Basic White card stock to measure 9cm x 14.3cm and another measuring 1.5cm x 9.5cm for the sentiment layer
  4. On the bottom right hand side of the BASic White layer stamp the leaves in Parakeet Party ink
  5. On a spare piece of Basic White card stock stamp the large and small Poinsettia in Sweet Sorbet ink and three of the holly leaves in Parakeet Party. Use the coordinating dies to cut out all images
  6. Adhere the die cut leaves to top of the stamped leaves using glue
  7. Adhere the two Pionsettia die cut pieces on top of the holly using Dimensionals
  8. Adhere our Sweet Sorbet Matt Decorative Dots to the centre of the Poinsettia and then three around the leaves
  9. Glue the Basic White layer to the Sweet Sorbet matt layer and then to the card front with glue
  10. Stamp the sentiment in Versamark ink on the sentiment strip of Sweet Sorbet card stock. Sprinkle with White Embossing Powder and set with the heat tool. Adhere to the card front using glue
  11. Tie a 25cm length of the Parakeet Party Bakers Twine in a a triple bow and glue to the bottom of the Poinsettia
  12. Flick some Wink of Stela onto the card front for some extras sparkle


Many thanks for visiting my blog today. You are appreciated. 
I do hope you are making Christmas cards this year for friends and family.

Product List
Heat Tool
[129056]
$53.00
Paper Snips
[103579]
$19.25

Sunday 20 November 2022

Stamping Inkspirations Blog Hop - Colour and or CAS


Hello and welcome to the Stampin Inkspirations Blog Hop for November! 

This months theme is Colour and or CAS (Clean and Simple). I have gone with the beautiful green colour palette in image below. Granny Apple Green, Soft Sea Foam, Pear Pizzazz, Garden Green, Evening Evergreen and Soft Succulent. The Splendid Thoughts Bundle is perfect for this colour palette.


Here is my card in the lovely greens - green is my favourite colour. And, I love all the shades of green that Stampin' Up!® offer.


  1. Start with a Soft Sea Foam card base measuring 21cm x 14.9cm scored and folded in half
  2. Cut a piece of Soft Sea Foam card stock to measure 10cm x 14.3cm
  3. Cut a piece of the green Splendid Day Designer Series Paper to measure 9.8cm x 14.1cm and glue to the above matt later. Then glue to the card base
  4. Cut a piece of Soft Sea Foam card stock to measure 10.9cm x 8cm
  5. Cut a piece of Basic White card stock to measure 10.6cm x 7.7cm
  6. Stamp the solid leaf image in Pear Pizzaz ink on the right hand side of the Basic White piece. Then adhere this piece to the Soft Sea Foam card stock measuring 10.9cm x 8cm. Adhere both these layers to the card front using Dimensionals
  7. Die cut two different outline images, the taller one in Soft Sea Foam card stock and the shorter one in Granny Apple Green card stock
  8. On a piece of Basic White card stock stamp the outline in garden Green Ink and colour the inside with Soft Succulent Stampin' Blends before die cutting it out with the coordinating die
  9. Arrange all the leaves and adhere to the card front using glue and Dimensionals in a design you are happy with
  10. Die cut a the pot in Evening Evergreen card stock. Run a 6cm length of the Soft Succulent open weave ribbon around the pot and secure at the back with Tear n' Tape  before adhering to the bottom of the leaves using Dimensionals
  11. Tie a 15cm length of the Linen Thread in a double bow and adhere to the left hand side of the pot with glue
  12. Stamp the sentiment in Evening Evergreen ink on Soft Sea Foam card stock and die cut this sentiment with the rectangle form the Give it a Whirl dies or cut with paper trimmer into a rectangle. Adhere to the right hand side of the bowl with Dimensionals


Up next on our Blog Hop this month is the lovely and talented Mo Rootes.

Click on the next button below to head to their blog post 


Angie McKenzie  ●  Karen Henderson  ●  Leonie Stuart

Mo Rootes  ●  Susan Webster  

Vickie Littlewood   ●  Tricia Butts  ●  Teri West


Many thanks for visiting my blog today.


Have a creative week!
Product List
Heat Tool
[129056]
$53.00
Paper Snips
[103579]
$19.25