Wednesday 28 July 2021

Colour INKspiration #104


Hello there!

It is time for another Colour INKspiration Challenge.

This months colour palette was chosen by crew member Rose Packer. I really love this image and the chosen colours. It lends itself to many options with stamp sets.


When I sat down to create for this challenge I was itching to create with the very sweet Measure of Love stamp set. It came in my last order and required inking up straight away.  
I am sure that you get it!!

Here is my Measure of Love card with the challenge colours.


  1. Start with a Basic White card base measuring 21cm x 14.9cm scored and folded in half
  2. Cut another piece of Basic White card stock to measure 10cm x 14.9cm
  3. Cut a pice of the black and white check to measure 9.7cm x 14xm  from the Pattern Party DSP and glue this to the 10cm x 14.9cm piece of Basic White card stock
  4. Use a scalloped rectangle die from the Scalloped Contours Dies to cut out a scallop rectangle in Basic White card stock
  5. Stamp the images in Memento™ Tuxedo Black ink and Cherry Cobbler ink on Basic White card stock and fussy cut them out
  6. Use Dimensional's to secure the scales and bowl to the scallop rectangle 
  7. Tie two lengths of Black twine around the centre of the check layer and secure at the back with Seal+. Tie a length of Black Twine in a double bow on the right hand side of the black twine.
  8. Secure the scallop rectangle layer with images to the top of the check layer using Dimensional's
  9. On a piece of Basic Black card  stock stamp the sentiment stock in Versamark™ ink. Sprinkle with White Stampin' Emboss Powder and set with the heat tool. Trim to a rectangle or use a Stitched Rectangle Die. Secure this to the card front on the left hand side using Dimensional's
  10. Finish the card by securing three Matte Black dots around the images on the check layer


Many thanks for visiting my blog today.

Make sure you check out the Colour INKspiration Challenges page on Facebook.

 We would love you to join us!

Stay well friends.


Product List

Monday 26 July 2021

Stampers Showcase Blog Hop - Mini Catalogue Sneak Peak


Hello and welcome to the July Stampers Showcase Blog Hop. The crew have some amazing new projects to share with you this month as we are showcasing projects created with new products that are available in the new Mini Catalogue available to customers from 3 August. I am excited to announce that we are also having second Sale-A Bration from 3 August until 30 September! How amazing is that and the Free items are just sensational!


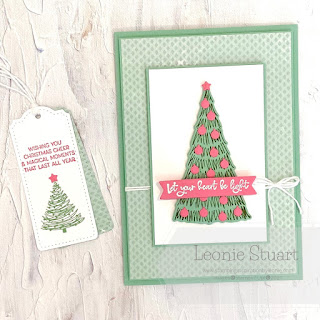
For this months theme I have created a card and coordinating tag using the fun Whimsy & Wonder Suite. I am loving the gorgeous colour palette in the DSP, wait until you see it!


Here is the card and the coordinating tag. Such beautiful colours for a fun Christmas!


  1. For the card start with a Mint Macaron Card base measuring 21cm x 14.9cm scored and folded in half
  2. Cut another piece of Mint Macaron card stock to measure 10cm x 14.3cm for a matt layer
  3. Cut a piece of the Mint Macaron Whimsy and Wonder Specialty Designer Series Paper to measure 9.7cm x 14cm and glue this to the matt layer
  4. Cut a piece of Mint Macaron card stock to measure 6.8cm x 10.4cm
  5. Cut a piece of Basic White card stock to measure 6.5cm x 10.1cm and glue this to the Mint Macaron 6.8cm x 10.4cm piece of card stock
  6. Stamp the Christmas tree in Mossy Meadow ink on a piece of Mint Macaron card stock. Die cut using coordinating die
  7. Die cut the Baubles and Star from Polished Pink card stock using the dies from the Christmas Tree Dies and glue to the tree. Use dimensionals to pop the tree up one the Basic White layer
  8. Stamp the sentiment from the Whimsical Trees stamp set in Versamark™ ink on Polished Pink card stock then sprinkle White Embossing Powder over the top and set with the Heat Tool. Trim this sentiment into a banner shape with paper snips and secure to the top of the tree with dimensional
  9. Tie two lengths of twine around the bottom third of the Mint Macaron DSP layer and secure at the back using Seal+. Tie another length of twine in a double bow and secure to the right hand side of the card using Glue Dot
  10. Secure the Christmas tree layer to the front of the card using dimesional
  11. For the Tag I have stamped the tree in Mint Macaron ink and the sentiment in Polished Pink ink on Basic White card stock. I cut another star from the Polished Pink card stock and glued it to the tree top. I die cut this using one of the largest Tailor made tags. I also die cut a piece of the Mint Macaron DSP using the same size die. I then tied them together at the top with a double length of the White Baker's Twine


Next up is the lovely and talented Jo Blackman.

Please click on the next button below to continue to hop around to see the crews amazing creations.


Many thanks for visiting my blog today. You are appreciated!

Have a crafty week and stay well friends.


Product List

Wednesday 14 July 2021

Around the World on Wednesdays | CASe a Team Member


Hello and welcome to another fun Around the World on Wednesday Blog Hop!

This months theme is CASe a Team Member. Here is a photo of the team and we are from all over the world! 


You may have come from my dear friend Jan Clothier who has CASed me. I cannot wait to see what she has CASed. She is such a wonderfully creative lady whose work I love.

I am CASeing the very lovely and talented Rochelle Laird-Smith. Such an honour to be casing her for this challenge as I love her projects. There were so many of her creations that I could have chosen and I decided to CASe her. 

Here is the card I am CASeing from Rochelle.


Here is my CASed version of Rochelle's beautiful card.


  1. Start with a Calypso Coral card base measuring 21cm x 14.9cm scored and folded in half
  2. Cut a piece of Basic White card stock to measure  10cm x 14.3cm. Glue this to the card base
  3. Cut a piece of the spotty You're a Peach Designer Series Paper to measure 9.7cm x 14cm. Glue this to the card base on top of the Basic White layer
  4. Locate two of the layering circle dies. A scallop circle and then a plain circle that is slightly smaller than the scallop circle. Die cut a piece of the Basic White card stock using a scalloped circle die. Then die cut a plain circle using the striped DSP. Glue these together then adhere to the card base with Dimensional's
  5. Stamp the leaves in Pear Pizzaz ink on Basic White Card stock and die cut with the coordinating die. 
  6. Ink up the peaches using Petal Pink ink then use a sponge dauber and Calypso Coral ink to lightly sponge one edge od all the peaches. Use the coordinating die cut to cut out the peaches
  7. Die cut two stitched rectangles in Basic White and Calypso Coral card stock. Stamp the sentiment on the Basic White rectangle Calypso Coral ink. Then use the stitched lines to trim down the sentiment and glue to the larger rectangle. Adhere this sentiment layer to the left hand side of the scallop circle using DImensional's
  8. Secure the leaves and peaches to the striped circle using Dimensional's
  9. Tie a length of the Petal Pink Organdy Striped Ribbon in a knot. Use glue dots to secure this to the right hand side of the scalloped circle. Tie a length of the White Twine in a double bow and secure to the top of the Petal Pink Organdy Striped Ribbon using a glue dot
  10. Place three of the Calypso Coral sequins around the peaches image and sentiment. See below


Make sure that you head over to Rochelle's blog now for some amazing inspiration and to see who she is CASeing for this challenge. Click on the Next Blog Button below. 
I am looking forward to hopping around this month!


Thank you so much for stopping by today. 

You are appreciated.


Product List