Monday 30 August 2021

Stampers Showcase Blog Hop - Second Sale-a-Bration


It is time for another fun Stampers Showcase Blog Hop

Each month a group of friends from all over the world participate in a blog hop and create with a theme. This months theme is the amazing Second Sale a-bration for 2021!

It is fantastic to have a Sale a-bration before Christmas with Christmas products included!!


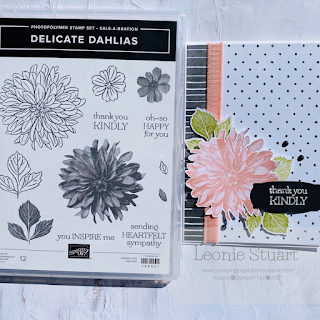
 For this months challenge I have created with two of the products on offer during this Sale a-bration.
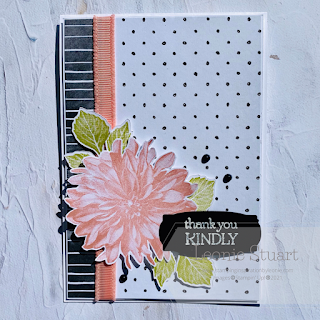
I am using the Delicate Dahlia's stamp set and the gorgeous Beautifully Penned 12'x12' Designer Series Paper.


  1. Start with a Basic White card stock measuring 21cm x 10.5cm scored and folded in half to create a portrait card
  2. Cut another piece of Basic White card stock to measure 10cm x 14.3cm
  3. Cut two piece of the striped Beautifully Penned DSP to measure 3cm x 14cm and the spotty DSP to measure 7.5cm x 14cm
  4. Glue the striped DSP to the left hand side of Basic White mat layer then glue the spotty DSP on the right hand side of the mat layer. There will be a thin border and the spotty layer will overlap the striped layer on the left hand side
  5. Cut a 16cm piece of the blushing Bride Frayed Grosgrain Ribbon and secure it to the join between the DSP's using glue dots to secure at the back. Glue these layers to the Basic White card base
  6. Stamp the Dahlia inBlushing Bride ink and the leaves x  3 in Pear Pizazz on Basic White card stock. Fussy cut these images out
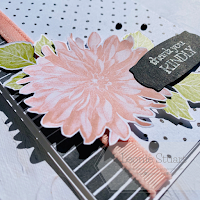
  7. Use Dimensionals to secure the Dahlia to the lower third of the card front. Then use mini DImensionals to secure the three sets of leaves behind the Dahlia
  8. Stamp the sentiment on a piece of Basic Black card stock in Versamark™ ink. Sprinkle with White Embossing Powder and set with the heat tool. Die cut using the Messages Dies or use whatever you have including trimming down with snips
  9. Secure the sentiment to the right hand side of the Dahlia with Dimensionals
  10. Secure three of the Matte Black Dots around the bloom


Up next on the hop is the very talented Melissa Seplowitz from the USA

Make sure that you head over to her blog post by clicking the next button below


Many thanks for visiting my blog today. I really enjoy sharing how I create my cards and hope to inspire you to get creative too!

Have a crafty week and stay safe!


Product List

Wednesday 25 August 2021

Colour INKspiration #106


Welcome to another Colour INKpiration Crew Challenge blog post.

If you think that you would like to join or see more of the Colour INKspiration Challenges make sure that you head to our Facebook group, see link below. We would love to have you join us and create for some of the challenges! 
 
It's so easy. Firstly, get some INKspiration by checking out all of the creations of the Colour INKspiration Crew in the challenge album on our Facebook page. Then you have 12 days from today to make and upload your creation to the Facebook Colour INKspiration Group. You don't have to have a blog to participate but if you do you can link back to your post. Make sure you use all of the challenge colours. You can also use neutrals such as Whisper White, Very Vanilla, Crumb Cake, Sahara Sand and Basic Black as well as Metallics.

The image below chosen by crew member Lou Kitzelman is such a beautiful and timely image. It reminded me of warm sunny days spent on holiday. I am sure we all wish for a holiday somewhere in the sun, wherever we live around the world. Perhaps a Christmas holiday in the mediterranean. 


As I looked at the image I felt that I could create a summery Christmas card using these colours. I looked no further than the beautiful images on page 24 of the Mini Catalogue. I love the card with the ornaments suspended and wanted to create something similar with the challenge colours. Here is my card for this challenge.


  1. Start with a Pool Party card base measuring 21cm x 14.9cm scored and folded in half
  2. Cut another piece of Pool Party card stock to measure qocm x 14.3cm and run this through the Cut& Emboss machine using the Brick & Mortar embossing folder to create an embossed image in landscape
  3. On a piece of Basic White card stock measuring 6.5cm x 10cm stamp the ornaments in Night of Navy ink at the top of the top. Colour these images in using the Real Red, Night of Navy and Pool Party Stampin' Blends
  4. Glue the Ornament layer to the Brick & Mortar layer and then use glue to adhere to the card base
  5. Stamp the sentiment on Night of Navy  card stock in Versamark™. Sprinkle with White embossing powder and set with heat tool. Cut it out using the smallest Stitched Rectangle Die. Use mini dimensionals to secure to the right hand side of the ornament layer
  6. Secure a Night of NavyHoliday Rhinestone Basic Jewel to the centre of each of the Real Red ornaments for some bling!


Many thanks for stopping by today. It really is lovely to have so many people subscribed to my blog. I would love you leave a comment below so that I know who you are and where you are from. It is good to feel connected to others.

Take care friends!


Product List