Wednesday 28 October 2020

Colour INKspiration #88


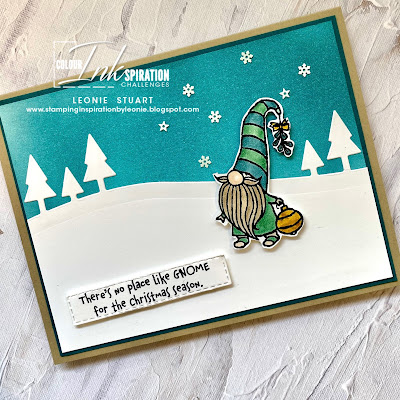
Hello and welcome to my blog post for Colour INKspiration #88.

I love the beautiful inspiration image for this challenge.  I am sure that this is sure to inspire you as well.


The Gnome For The Holidays stamp set was perfect for my Christmas Card in the challenge colours.

I have created the card using US imperial measurements as the card needed to be wide to accomodate the whole scene.


  1. Start with a Crumb Cake card base measuring 5 1/2 inches x 8 1/2 inches.
  2. Cut a matt layer of Pretty Peacock card base measuring 4 inches x 51/4 inches
  3. Cut two pieces of Whisper White to measure 3 7/8 inches x 5 1/8 inches.
  4. Die cut the trees and horizon layer from one of the Whisper White pieces of card stock
  5. Using Pretty Peacock ink and a Sponge Brayer colour the other piece of Whisper White card stock.
  6. Glue the horizon and tree layer to the bottom of the sponge bartered layer.
  7. Glue these layers to the Pretty Peacock matt layer and then to the card base. Leave to dry.
  8. Stamp the gnome in Memento™Tuxedo Black ink on a piece of Whisper White card stock. Colour him in using the Pretty Peacock, Just Jade and Crumb Cake Stampin' Blends. Use the Crushed Curry Stampin' Write Marker for the ornament and the bow. Fussy cut him out.
  9. Stamp the sentiment in Memento™Tuxedo Black ink on a piece of Whisper White card stock. Die cut with a Stitched Rectangle die.
  10. Pop both the gnome and sentiment up on the card front using dimensionals.
  11. Glue the Snowflake Sequins to the top right of the scene to complete the scene.
Thank you for visiting my blog post today!

You are appreciated!

I hope you have the chance to be creative this week. 

A perfect time to start creating for Christmas 2020!

Product List

Monday 26 October 2020

Stampers Showcase Blog Hop - Heat or Dry Embossed Technique


Hello and welcome to my blog post for the Stampers Showcase Blog Hop for October. I really enjoy all the amazing creations that the design team create each month. Make sure that you click on the next button at the bottom of my post to begin hopping!


For my card I have used the Heat Embossing technique in two different ways.

  1. Start with a Bermuda Bay card base measuring 21cm x 14.9cm scored and folded in half.
  2. Cut a piece of Whisper White card stock to measure 10.3cm x 14.6cm.
  3. Cut a piece of Bermuda Bay card stock to measure 10cm x 14.3cm.
  4. On the Bermuda Bay piece stamp the sunflower image around the outside of the whole piece using Versamark™ ink and sprinkle with the White Stampin' Emboss Powder and set with the Heat Tool. I use an Embossing Buddy prior to stamping my images to prevent the powder from sticking to unwanted areas of the card stock.
  5. Glue the embossed layer to the Whisper White card stock and leave to dry.
  6. Using the Stamparatus  stamp the sentiment in Bermuda Bay ink on a piece of Whisper White card stock. Clean the stamp off without removing the stamp or the piece of  a piece of Whisper White card stock. Stamp the sentiment again but in Versamark™ ink the second time. 
  7. Remove the card stock sentiment layer from the Stamparatus and sprinkle with Clear Stampin' Emboss Powder and set with the Heat Tool.
  8. Die cut the sentiment with the coordinating die from the Stitched So Sweetly Dies
  9. Tie a length of the White ribbon around the Bermuda Bay flower label and secure at the back with  Glue Dots. Then adhere this layer to the card base with glue.
  10. Tie another piece of ribbon to the ribbon in a bow on the right hand side of the card.
  11. Pop the sentiment up with Dimensionals and adhere to the right hand side of the card front.
  12. I have included a picture of the inside of my completed card. I stamped the sentiment and floral image in Bermuda Bay ink. The sentiment is from the Beautiful Autumn stamp set.


Please keep hopping and head over to Rebecca-Jo Unwin's amazing project.

Just click on the next button!


Thank you so much for visiting my blog today! I greatly appreciate it!

If you are visiting my blog I would love you to subscribe and get my posts straight to your inbox. Just click on the subscribe to the right of this post.

I hope you are having a great week!


Product List
Heat Tool
[129056]
$50.00
Paper Snips
[103579]
$17.00

Friday 16 October 2020

Don’t Stop Believing

 Hi there!


A quick post to share some cute Christmas cards that I created with the fun Don’t Stop Believing stamp set from the Mini Catalogue.


I really enjoyed colouring with the the Stampin’ Blends for both cards.

I have kept them fairly simple focusing on colouring. It was very relaxing! 


The stamp set is so sweet! 


AU$35

153332

Have a fantastic day!


Wednesday 14 October 2020

Colour INKspiration #87


It is time for another fun Colour INKspiration Crew creation and blog post!

Another stunning inspiration photo too! I really love this colour palette!


I was recently gifted the gorgeous Jar of Flowers stamp set from a beautiful and dear friend of mine!

 I could not wait to start creating with this bundle!


  1. Start with a Sahara Sand card base measuring 21cm x 14.9cm scored and folded in half.
  2. Cut a piece of Very Vanilla card stock to measure 14.7 x 10.3cm for a matt layer.
  3. Cut a piece of Very Vanilla card stock to measure 14.4cm x 10 cm and run this through your Cut & Emboss machine with the Subtle 3D Embossing Folder. Then glue this to the Very Vanilla matt layer and then to the card base and set aside to dry.
  4. Stamp the Thank You sentiment from the Peaceful Moments stamp set in Sahara Sand on  the right hand side of a piece of Very Vanilla card stock measuring 10cm x 2.5cm. Glue this to the bottom third of your card front and allow this to dry.
  5. Stamp the vase and sunflower images in Memento™ Tuxedo Black ink on Whisper White card stock. Colour with ink from your ink pads. I squeeze ink onto the lid of the stamp pad then use a Water Painter to colour my images. I have used both Mango Melody and Pumpkin Pie on my Sunflowers.
  6. Cut images out using Paper Snips and /or the coordinating jar punch then trim off the top of the vase.
  7. Wrap a piece of Linen thread around the vase and tie a bow in the centre at the front. Secure behind using Tear n' Tape.
  8. Use Dimensionals to pop both the vase and sunflowers up on the left hand side of the sentiment layer.


I really enjoyed sitting and water colouring the images form the Jar of Flowers stamp set. It was a very simple and quick card to create.

I hope you get to see all the crews creations for this challenge on our Facebook page here.

Hope you are having a good week. We have had all season this week here and I am hoping for some rain today for my newly established garden.

Take care!

Product List
Paper Snips
[103579]
$17.00