Monday 29 November 2021

Stampers Showcase Blog Hop - Winter/ Holidays


Hello and welcome to my blog post for the Winter/Holidays Stampers Showcase Blog Hop!

The team have been creating some wonderful projects for this months challenge that will be wonderful as you are possibly preparing for the Festive Season!

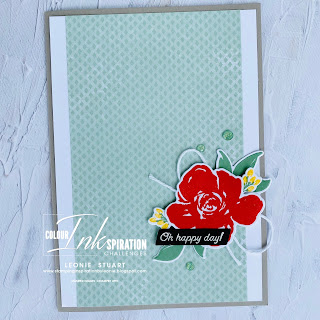
I love everything Christmas and love wintery Christmas scenes. For this months challenge I wanted to use the beautiful Words Of Cheer Bundle to create a wintery holiday card.


  1. Start with a Crumb Cake card base Measuring 21cm x 14cm scored and folded in half
  2. Cut another pice of Crumb Cake card stock to measure 10.3cm x  13.8cm. Use the Cut & Emboss Machine with the Stitched With Whimsy die to cut the detailed edge. 
  3. To alter the Stitched With Whimsy layer I used a mixture of Whisper White Craft Ink and an equal part of Alcohol and sprayed the front of the card stock leaving to dry before gluing to the card front
  4. Using the Christmas Cheer Dies die cut the word Happy using Crumb Cake card stock. Die cut the outline of the word Happy with the leaves and the holly leaves using Evening Evergreen card stock and the berries in Cherry Cobbler card stock
  5. Glue the Crumb Cake word to the Evening Evergreen and leave to dry
  6. Cut a 15cm length of Linen Thread and tie in a bow. Secure this to the back of the die cut word and then secure the layers to the bottom third of the card front using Dimensionals
  7. Arrange the holly leaves and berries around the word happy and secure with glue
  8. Stamp the Holidays sentiment in Evening Evergreen ink below the word happy on the card front and you are done!


Up next on our hop is the amazingly talented Dana Sullivan

Click in the next blog button below to head to Dana's  blog post for some wonderful Winter Holiday inspiration!


Many thanks for visiting my blog post today!

Have a crafty week!

Product List

Wednesday 24 November 2021

Colour INKspiration #112


Hello and welcome to another fun colour INKspiration Challenge! The crew have been busy creating for the CI#112 challenge. You can see everyones project here on our Challenge Facebook Page. We would love you to join in on a challenge too. Just head to our Facebook page and answer the three questions asked to join.

This challenges inspiration image was chosen by crew member Vicki Boucher. 
Such a lovely Australian image!


I love the native Australian foliage in the inspiration image but when I looked at the colour palette I saw a Cath Kidson print that would not go away. So I have chosen the All Things Fabulous stamp set for its charming blooms!


  1. Start with a Gray Granite card base measuring 21cm x 14.9cm scored and folded in half
  2. Cut a piece of Basic White card stock to measure 10cm x 14.3cm
  3. Cut the Mint Macaron piece of Whimsy & Wonder DSP to measure 14.3cm x 8.5cm and glue this DSP to the Basic White layer and then both those layers to the card base
  4. On Basic White card stock stamp the flower in Poppy Parade, the two leaves in Mint Macaron and the two sprigs in Daffodil Delight and Mint Macaron. Die cut these elements
  5. Tie a 15cm piece of the white Baser's Twine in a bow and secure to the bottom right of the card front using a Glue Dot
  6. Arrange the bloom and adhere to the front of the card using Dimensionals. I started with the leaves, then the sprigs with the bloom going on last
  7. On a piece of Basic Black card stock stamp the sentiment in Versamark™. Sprinkle with the White embossing powder and set with the heat tool. Use paper snips to cut the sentiment out and secure to the bottom of the blog using Dimensionals
  8. Secure three of the Mint Macaron Genial Gems around the bloom and you are done!


Many thanks for stopping by today! I appreciate you!

Have a wonderful week!


Product List

Sunday 14 November 2021

Stamping INKspirations Blog Hop | Thank You


Hello and welcome to another Stamping Inkspirations Blog Hop.

This month the crew have been busy creating Thank You cards. I never have enough thank you cards in my stash as I send them out regularly. Thank you cards are something I like to have on stand by all the time. For this challenge I wanted to have a pink and pretty card. I chose Polished Pink as it is such a fun and vibrant colour and it would really colour someones day.

Here is my card.


  1. Start with a Sahara Sand card base measuring 21cm x 14.9cm scored and folded in half
  2. Cut a piece of Basic White card stock to measure 14.3 x 10cm
  3. Cut a piece of the Polished Pink Designer Series Paper from the Whimsy and Wonder DSP to measure 10cm x 10cm
  4. Cut a piece of Basic White card stock to measure 10cm x 4.5cm and emboss with the Timeworn Type 3D Embossing Folder
  5. Glue the Polished Pink DSP to the top of the 14.3 x 10cm piece of Basic White card stock and the embossed Basic White piece to the bottom
  6. Cut a 20 cm length of the Polished Pink open weave ribbon. Using snips cut in half lengthways to create a thinner ribbon. Wrap a 12cm around the front of the card stock where the Polished Pink meets the white and secure at the back. Tie the other 20cm in a triple bow to secure to the right hand side of the card later
  7. Stamp the flowers in Polished Pink ink and the branch in evening Evergreen on Basic White card stock. Die cut these elements out using the coordinating die
  8. Die cut the label from the Tasteful Labels Dies from a piece of Basic White card stock
  9. Secure the flowers and leaves to the label using Dimensionals
  10. Secure the label to the front of the card as in image above then secure the bow to the right hand side of the label
  11. Stamp the sentiment in Evening Evergreen on a piece of Basic White card stock and trim using Paper Trimmer. Secure sentiment to the left hand side of card below ribbon using Dimensionals
  12. Secure three of the Polished Pink Jewels around the floral image on the label and tie the bow andyou are finished!


Up next on this months Stampin Inkspirations Blog Hop is the lovely Jan Musselman.

Click on the next blog button below to head to Jan's blog post for more amazing Thank You creations!


Thank you so much for taking the time to read my blog and subscribing as well.

Have a creative week!


Product List