Monday 28 March 2022

Stampers Showcase Blog Hop - Thanks and Gratitude


Hello and welcome to the Stampers Showcase Blog Hop for March 2022!

This month the crew have been busy creating projects with Thanks and Gratitude as the theme. I love to send Thank You cards and can never have enough in my "ready to go" stash.

I wanted to use some of my favourite retiring product for this challenge as well. I have chosen Bumblebee as my base colour. I am sad to see this happy colour retire. I have created my card using the beautiful Flowing Flowers stamp set and Stitched So Sweetly Dies. Both favourite retiring products.


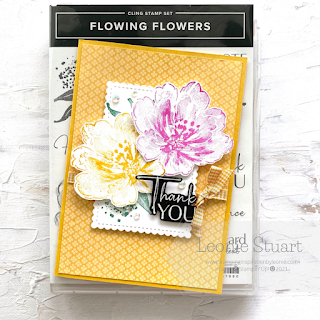
  1. Start with a Bumblebee card base measuring 21cm x 14.9cm scored and folded in half
  2. Cut a piece of the Bumblebee Designer Series Paper to measure 10cm x 14.3cm
  3. Cut a 12cm length of the Bumblebee Gingham Trim and adhere it to the lower half of the DSP securing at the back with Glue Dots or Tear n' Tape. Glue this to the card base
  4. Die cut a Stitched So Sweetly rectangle from Basic White card stock
  5. Stamp the leaves in Just Jade ink on the  twice. Once on the top left and then in the middle at the bottom. Adhere this layer to the centre f the card using Dimensionals
  6. Stamp the larger flower in Bumblebee then Magenta Madness on Basic White card stock. Fussy cut both out then adhere to the top layer using DImensionals
  7. On basic Black card stock stamp the sentiment in Versamark™ ink, sprinkle with white embossing powder and set with the heat tool. Fussy cut close to the sentiment letters. Adhere to the card front using DImensionals
  8. Tie a 10cm length of the Bumblebee Gingham Trim to the right hand side of the sentiment
  9. Secure five of the Iridescent Rhinestone Basic Jewels to the card front as in image or however you would like


Many thanks for visiting today. Make sure that you check out all the crews Thanks and Gratitude projects following the links below. Have a great week!


Product List

Wednesday 23 March 2022

Colour INKspiration #118


Hello and welcome to Colour INKspiration #118!

The crew would love you to join us for one of the challenges! It's so easy. Firstly, get some INKspiration by checking out all of the creations of the Colour INKspiration Crew in the challenge album on our Facebook page. Then you have 12 days from today to make and upload your creation to the Facebook Colour INKspiration Group. You don't have to have a blog to participate but if you do you can link back to your post. Make sure you use all of the challenge colours. You can also use neutrals such as Whisper White, Very Vanilla, Crumb Cake, Sahara Sand and Basic Black as well as Metallics. 

Not a member of the Colour INKspiration Facebook group yet? Just click here and ask to join Colour INKspiration, add the group to your favourites and share it with your crafty friends so they can join in the fun too. Make sure that you answer the joining questions. We can't wait to see what you create with these gorgeous colours.

This months amazing inspiration image was chosen by crew member Bronwyn Eastley. I have succulents in pots and looked to them for more inspiration. They are simply gorgeous and easy to care for. I chose the Cactus Cuties stamp set for my card for this challenge.


Here is my Cactus Cuties card with the challenge colours.  


  1. Start with a Garden Green card base scored and folded in half
  2. Cut a piece of Very Vanilla card stock to measure 8.5cm x 12.9cm
  3. Cut another piece of Very Vanilla card stock to measure 8.1cm x 12.5cm. Use Garden Green Ink and Blending Brushes to colour the piece before running this through your Cut & Emboss Machine using the Macrame 3D Embossing Folder.Then glue to the other piece of Vary Vanilla card stock and pop it up on the card front
  4. on Very Vanilla card stock stamp the pots in Basic Gray, The tall Cactus in Garden Green and the smaller one in Soft Succulent. Punch or fussy cut the images and adhere using Dimensionals to the left hand side of the card front. The smaller succulent and pot in front of the larger
  5. On a strip of Basic Black card stock stamp the sentiment in Versamark™ink, sprinkle with White Embossing Powder and set with the heat tool. Adhere to the right hand side of the card
  6. Adhere three of the Gray Pebbles Enamel Shapes to the bottom right of the pots as in image


Many thanks for stopping by my blog today. I really appreciate it.

Have a wonderful week!

Product List

Sunday 13 March 2022

Stamping Inkspirations Blog Hop - Embossing Techniques


Hello and welcome to the Stamping Inkspirations Blog Hop for March!

I love this months theme of Embossing Techniques!!  I decided to challenge myself to create a card with Embossing Techniques that I don't often use. I decided to use a decorative mask and Embossing Paste and also Heat Emboss an image in White on coloured card stock. It was fun creating this card starting with the embossed background layer and then deciding what to put on top. Here is my completed card.


  1. Start with a Basic White card base measuring 21cm x 14.9cm scored and folded in half
  2. Cut a piece of Basic White card stock to measure 10cm x 14.3cm
  3. Using a Palette Knife mix a tablespoon of the Embossing Paste with 1 drop of the Petal Pink ink on your silicone mat. Ensure that the colour is evenly mixed
  4. Secure your Basic White piece of card stock with tape and the floral Decorative Mask secured over the top. Spread the mixed embossing paste over the top of the mask using the Palette Knife. I have spread the embossing paste in the centre of the piece of Basic White card stock. Set aside to dry. Once dry use dimensionals to adhere to the card base 
  5. Stamp the flower in Versamark™ ink on a piece of Petal Pink card stock. Sprinkle with White embossing powder and set with the heat tool. Colour the petals of the flower with a White Stampin' Chalk Marker. Die cut using the coordinating die. Secure to the card front using Dmensionals
  6. Stamp the sentiment in Versamark™ Ink on a strip of Basic White card stock.Sprinkle with Gold Embossing Powder and set with the heat tool.  Trim closer to the letters and use Treasured Tag Punch to cut both ends
  7. Cut a 10cm length of the Petal Pink Organdy Stripe Ribbon and a 9.5cm length of the Fine Art Ribbon. Secure both together with Tear n' Tape and adhere across bottom of the flower stem using Dimensionals. Then using Tear n' Tape to secure the sentiment abel to the top of the ribbons. Banner both ribbons at the ends
  8. Secure three Brushed Brass Butterflies to card front


This was a fun way to create the background layer and colour the stamped image to make the Embossed image pop. It is something that I definitely will try again.

Up next on our blog hop is the very talented Tricia Butts.
Make sure that you click on the next blog button to head to Tricias's post for more inspiration


Have a great week friends!


Product List