Wednesday 27 May 2020

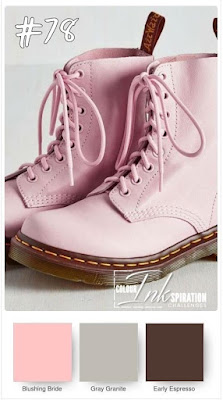
Colour INKspiration #78


Welcome to my Colour INKspiration #78 blog post.

We have some gorgeous pink Doc Marten's to inspire our creativity this challenge.


One of our families friends had a baby girl recently and the challenge colours are perfect for this baby card! I l really love making baby cards and Fable Friends is such a sweet stamp set to use when creating baby cards


  1. Start with a Thick Whisper White Card base measuring 21cm x 14.9 cm scored and folded in half.
  2. Cit a piece of the Blushing Bride Designer Series Paper with the check pattern to measure 10cm x14.4cm. Glue this to the front of the card base.
  3. Using one of the Stitched So Sweetly Scalloped Rectangles to cut a label out of Whisper White card stock.
  4. Stamp the Bunny in Gray Granite Ink and colour the bunny in Gray Granite Stampin' Blends.
  5. Use a Blender Pan and the Blushing Bride ink to colour the Bunnies coat, ears and cheeks.
  6. Cut a small leftover strip of the Blushing Bride Check DSP and lay it across the bottom of the Scaplloped Rectangle. Adhere with glue.
  7. Wrap a length of White Seam Binding Ribbon over the top of the DSP and secure to the back with Tear and Tape. Tie another small piece of ribbon in a knot around the secured ribbon on the right hand side.
  8. Stamp the sentiment from Itty Bitty Greeting in Early Espresso ink on the bottom right of the Scalloped Rectangle.
  9. Fussy cut the Bunny with your paper snips and use dimensionals to pop her up on the lower left hand side of Scalloped Rectangle.
  10. Pop this rectangle up on the front of the Check Blushing Bride DSP using dimensionals.
  11. Select three of the clear flower sequins from the Peaceful Poppies Sequins and place them on the card front. I have used glue to adhere them.


Thank you so much for reading my blog post today! I hope you feel inspired to create something with this colour palette and join in the Colour INKspiration Challenges on Facebook.

Take care of yourself, your family, friends and community!


Product List

Saturday 16 May 2020

Social Stamping Blog Host - Sunshine


Hello and welcome to my blog post for  the Social Stamping Blog Host!

"Sunshine" is the theme for this week!

Such a wonderful theme to be creating for with the current situation the world finds itself in. 

Stampin' Up!™ have released the Share Sunshine pdf download. It is a digital stamp set of light hearted and thoughtful sentiments and images for you to use to create with at this time. You purchase it and then download and print on Stampin' Up! ™card stock and use your trimmer, punches and dies to cut out the images. There is a link to this PDF at the bottom of my post.

For my card you can see that I have used one of the sentiments for my card for a friend. I have also used the beautiful Healing Hugs stamp set for my floral image. I have stamped my rose in Daffodil Delight as yellow is the perfect sunshine colour!


  1. Start with a Thick Whisper White card base measuring 21cm x 14.8cm scored an folded in half.
  2. Cut a piece of Whisper White card stock to measure 10cm x 14.3cm. Use the Coastal Weave Embossing folder to create the beautiful background layer.
  3. Stamp the floral images on a piece of whisper White card stock. Stamp the Rose in Daffodil Delight and the leaves in Garden Green. Fussy cut these images with your paper snips.
  4. Print out the Share Sunshine pdf and using the label die from the Painted Labels Dies cut out the black sentiment.
  5. Lay the Polka Dot Tuille across the front of the Coastal Weave layer and secure with glue dots on the back Glue this layer to the card base.
  6. Place then secure the sentiment layer on the Coastal Weave layer using dimensionals.
  7. Arrange the Rose and Leaves to the left of the sentiment and secure with dimensionals.
  8. Place three Clear Epoxy Droplets around the sentiment.


Make sure you head over to The lovely Jo Weeden’s  Blog Post by clicking on the next button below!


https://joweedon.blogspot.com/2020/05/spreading-some-social-sunshine.html


You can also check out the list of all the participating people here on Kelly Kent's post.

Here is an image of the Sharing Sunshine PDF  Download that is available to be purchased. The colours coordinate with Stampin' Up!™ colours. They are a lot of fun. 

As part of Stampin' Up!'s ™ Making a Difference program, 100% of the Share Sunshine PDF Download proceeds go to the World Health Organisation's COVID - Solidarity Response Fund and the United Way Worldwide COVID-19 Community Response and Recovery Fund.

This is a fantastic way that you can make a difference!

The download is charged in US dollars. I paid AU$24. It is charged in your currency based on the current exchange rates.

I can't wait to make some more cards with these fun images and sentiments.

You can get your download here!


Thank you for taking the time to visit my blog post today. I do appreciate it!

Take care of yourself, your family and your community!


Product List

Wednesday 13 May 2020

Colour INKspiration #77


Hello and welcome to my blog post for Colour INKspiration #77!

Another gorgeous inspiration photo to inspire all of us. Wouldn't it be the most amazing thing to lie in a field of tulips looking up to a perfectly blue sky!


I chose this colour palette to create a card for Mothers Day. 

They are soft, beautiful and calming colours that work perfectly together.


  1. Start with a Soft Sea Foam card base measuring 21cm x 14.9cm scored and folded in half.
  2. Cut a piece of Garden Green Card stock to measure 10cm x 14.4cm for your matt layer.
  3. Cut a piece of Soft Sea Foam card stock to measure 10cm x 14.4cm and use the Scripty 3D Embossing folder to create another matt layer. You will need to cut this down to measure 9.7cm 14.1cm after you have embossed it.Glue to the Garden Green Matt layer.
  4. Cut a Stitched Nested Label in Very Vanilla Card Stock. Stamp the sentiment from Itty Bitty Greetings in Garden Green Inkon the bottom right hand side of the Stitched Nested Label.
  5. Cut two of the background sprays from the Frosted Bouquet Dies out of Soft Sea Foam card stock.
  6. Stamp all the images on Very Vanilla card stock. I have used Old Olive for the leaves and stems and Seaside Spray for the flowers. I used the Stampartus to stamp the images that have two colours in them.
  7. Arrange the flowers and background spays on the Stitched Nested Label and secure with dimensionals and glue dots. You can choose what to pop up yourself.
  8. Cut a piece of the Whisper White Crinkled Seam Binding ribbon to measure 25cm Colour with the Dark Soft Sea Foam Stampin' Blend. Cut 12cm off and wrap this around the Scripty layer and secure at the back with tear and tape. With the remaining ribbon tie a bow on the right hand side. Glue this layer to the card base.
  9. Pop the Stitched Label layer up on the card front using dimensionals.


Thank you for visiting my blog today. 

You are greatly appreciated!

Take care of yourself, your family, friends and community!


Product List

Tuesday 12 May 2020

Kylie's Demonstrator Training Program Monthly Team Blog Hop


Hello and welcome to my post for Kylie's Demonstrator Training Program Monthly Team Blog Hop!

We are in the final month of the Annual Catalogue and I will miss the beautiful In Colours that are retiring. In Particular Lovely Lipstick. It has been such a vibrant colour that I really have enjoyed using. The ladies that come to my classes will vouch for that.

I have loved the Best dressed Designer Series Paper since it came out in the Mini Catalogue in January. Such a beautiful selection of feminine DSP. I have made this card with both of those products and j=have let this gorgeous DSP do all the work. I have the instructions for this very easy to make card below and have included how I decorated inside the card. A great way to use your DSP and would work with most sentiments and labels.


  1. Start with a Lovely Lipstick card base measuring 10.5cm x 29.8cm scored and folded in half
  2. Cut another piece of Lovely Lipstick card stock to measure 14.4cm x 10cm.
  3. Cut a piece of the floral DSP to 14.1cm x 9.7cm and glue to the Lovely Lipstick matt layer and then to the Lovely Lipstick card base.
  4. Stamp the sentiment from So Sentimental in Lovely Lipstick ink.
  5. Die cut this sentiment with the label from the Stitched So Sweetly Dies.
  6. Cut three pieces of Whisper White Crinkled Seam  Binding Ribbon to measure 12cm each. Colour this ribbon with the dark Lovely Lipstick Stampin' Blend.
  7. Lay two pieces of ribbon together across the top half of the DSP layer and adhere to the card base with Tear and Tape.
  8. Place dimensionals behind the sentiment and pop the sentiment uo on the top of the ribbon. Cut the edges of the ribbon so that they do not hang over the edge of the card.
  9. Cur a piece of Whisper White Card stock to measure 10cm x 14.4 cm. 
  10. Cut a piece of the DSP to 10cm x 6cm and glue to the bottom of the Whisper White piece of card stock.
  11. Lay the last piece of ribbon over the top of the DSP and secure at the back with Tear and Tape.
  12. Adhere to the centre of the card with glue.


I hope you have enjoyed my quick and easy card for this months blog hop.

Make sure you purchase those retiring items before they are gone forever.

Hope you are enjoying being creative at the moment. It is always a good way to relax and unwind.


Product List