Monday 27 December 2021

Stampers Showcase Blog Hop - Mini Catalogue Pre Order


Hello and welcome to the final Stampers Showcase Blog Hop for 2021!

This month we are featuring Pre-Order product from the new Mini Catalogue that is available to customers in January. There are so many beautiful items to choose from in the Mini Catalogue. A lot of stamp sets and dies that are very different from previous catalogues.  

I have used the Heart & Home Bundle for my project this month teaming it with the new Brushed Brass Butterflies. I think the sweet Butterflies complement any floral or nature stamp sets you may have.


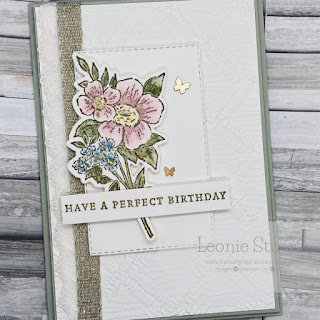
  1. Start with a Sahara Sand card base measuring 21cm x 14.9cm scored and folded in half
  2. Cut another piece of Sahara Sand card stock to measure 10cm x 14.3cm
  3. Cut a piece of Shimmery White card stock to measure 9.7cm x 14cm and run this through the Cut & Emboss machine using the Macrame 3D Embossing Folder. Glue this to the Sahara Sand matt layer  
  4. Run a 15cm length of Very Vanilla Scalloped Lace Trim and then 15cm of Fine Art Ribbon on the left hand side of card from top to bottom. Securing with Seal+ at the back
  5. Glue the above layer to the card front
  6. Cut a Stitched Rectangle out of Shimmery White card stock using the Stitched Rectangle Dies
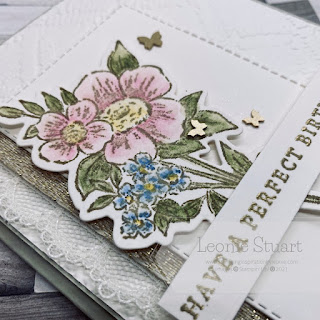
  7. On a piece of Shimmery White card stock stamp the floral image from the Heart & Home stamp set in Sahara Sand ink. Colour this image using Watercolour Pencils and a Water Painter. I have used Old Olive, Balmy Blue, Flirty flamingo and Daffodil Delight watercolour pencils. Cut out the image in the coordinating Flowers of Home Dies. Use Dimensionals to adhere to the Stitched Rectangle on the left side. Adhere this layer to the card front as in image above using Dimensionals
  8. Stamp the sentiment in Versamark™on a piece of Shimmery White card stock. Sprinkle with Gold Embossing Powder and set with the heat tool. Trim into a thin rectangle using paper trimmer and adhere across the bottom of the flower using Dimensionals
  9. Secure three of the Brushed Brass Butterflies around the flower and you are done


Please check back in January for the supplies used above from the Mini Catalogue.

Up next on our blog hop is Mo Rootes. I cannot wait to see what she has chosen from the new Mini to create with! So click on the next blog button below.


If you live in Australia and don't have a demonstrator, and would like a new catalogue, please reach out and I will post one to you!

Many thanks for stopping by today. I hope you have had a lovely Christmas and I wish you a very peaceful and happy 2022!

Sunday 12 December 2021

Stamping INKspirations Blog Hop | Christmas Songs


Hello and welcome to another blog hop from the amazing team at the Stamping Inkspirations blog hop group!

The team have some awesome projects to share with you as this months theme is Christmas Songs!

I love music and really love the Christmas carols and tunes playing at Christmas time. They just make me feel happy. I have based my card around Holly as it is mentioned in so many Christmas Carols and Songs. The holly I have used is from the Merriest Moments Bundle and I have teamed it with the Merry Melody 3D Embossing folder.


  1. Start with a Basic White card base measuring 21cm x 10.5cm scored and folded in half
  2. Cut another piece of Basic Shite card stock to measure 9.7cm x 13.9 cm
  3. Cu another piece of Basic White card stock to measure 9.5cm x 13.7cm. Run this through the Cut & Emboss machine using the Melody 3D Embossing folder then glue this to the slightly larger piece of BASci White card stock. Then adhere to the card front using Dimensionals
  4. On a pie ce of Basic Black card stock measuring 2cm x 13.9cm stamp the sentiment in Versamark™ink then sprinkle on some white embossing powder and set with the heat tool. Adhere to the card front using Dimensionals
  5. On a piece of Basic White card stock Stamp the holly in Cherry Cobbler ink and the two leaves in Shaded Spruce. Use the coordinating die to die cut the stamped images
  6. Adhere to the right hand side of the sentiment layer using dimensionals and glue
  7. Cut a 14 cm length of linen thread and tie it in a bow. Adhere this below th holly using a glue dot
  8. Adhere three of the Shaded Spruce Holiday Rhinestone Basic Jewels around the sentiment 
  9. and you are done!


Up next is the amazing Mo Rootes

Click on the next button below to head to her blog post. Then continue hopping around to see everyones Christmas Songs themed projects. I cannot wait to see what everyone has created.


Many thanks for visiting my blog post today. You are appreciated.

Have a lovely day!


Product List

Wednesday 8 December 2021

Around the World on Wednesdays - Something New, Something Old


Hello and welcome to another Around the World on Wednesday Blog Hop!

Each month a group of demonstrators from all around the globe get together and create projects with a theme to inspire you! The image below is where we are all from. It is so good to get together each month with these amazing ladies!


This months theme is "Something New, Something Old"!

I thought about this challenge for a while before settling on one of my oldest stamp sets and have used new Designer Series Paper from the upcoming January to June Mini Catalogue to compliment it. Here is my card.


  1. Start with a Smokey Slate card base measuring 21cm x 14.9cm scored and folded in half
  2. Cut another piece of Smokey Slate card stock to measure 10.2cm x 14.5cm
  3. Cut a floral piece of the Heat & Home Designer Series Paper to measure 10cm x 14.3cm in landscape. Glue this to the 10.2cm x 14.5cm piece of Smokey Slate card stock
  4. Cut a piece of Smokey Slate card stock to measure 10.5cm x 3cm. Run this through the Cut & Emboss machine using the Tasteful Textile Embossing Folder and glue this to the centre of the DSP
  5. Stamp the Bird image form the Free as a Bird stamp set in Soft Suede ink on a piece of Basic White card stock. Colour leaves with a Garden Green Stampin' Write Marker. Colour the flowers with Fresh Freesia Stampin' Blends. Colour the Birds with Pale Papaya and the Colour Lifter Stampin' Blends  Colour the branch in with Cinnamon Cider Stampin' Blends
  6. Stamp the sentiment in Soft Suede ink below the branch
  7. Use the largest circle die from the layering circle dies to cut out the birds
  8. Use the largest Scallop circle die to cut out a scallop circle in Smokey slate card stock and glue the stamped circle layer to this scalloped circle
  9. Cut a 13cm length of the Pale Papaya & White 1/2" Ribbon and adhere this to the Smokey Slate embossed band at the centre of the card front using glue dots. Angle both ends of the ribbon with scissors
  10. Pop the stamped circle layers up on Dimensionals and adhere to the left hand side of card front
  11. Colour three of the White Classic Matte Dots with the Fresh Freesia Stampin' Blends allow to dry and then adhere around the birds


Up next on our blog hop is the wonderful Rochelle Laird-Smith

Please click on the next blog button below to go to her post for more inspiration.


Thank you for visiting my blog post today. You are appreciated.

Have a great week!


Colour INKspiration #113


Hello and welcome to another fun Colour INKSpiration Challenge. The amazing crew have some wonderful projects to share with you!

INKspired to join the challenge? It's so easy. Firstly, get some INKspiration by checking out all of the creations of the Colour INKspiration Crew in the challenge album on our Facebook page. Then you have 12 days from today to make and upload your creation to the Facebook Colour INKspiration Group. You don't have to have a blog to participate but if you do you can link back to your post. Make sure you use all of the challenge colours. You can also use neutrals such as Basic White, Very Vanilla, Crumb Cake, Sahara Sand and Basic Black as well as Metallics.

Not a member of the Colour INKspiration Facebook group yet? Just click here and ask to join Colour INKspiration, add the group to your favourites and share it with your crafty friends so they can join in the fun too. We can't wait to see what you create with these gorgeous colours.

Here is our inspiration image for this challenge. How beautiful is that tree!! The very lovely Lou Kitzelman chose this beautiful image.


Here is my card for this challenge! I have used the Blessings of Home stamp set which is going to be available in the January to June Mini Catalogue.


  1. Start with a Polished Pink card base measuring 21cm x 14.9cm scored and folded in half
  2. Cut another piece of Polished pink card stock tp measure 10cm x 14.3cm and adhere this to the front of the card base using Dimensionals
  3. Cit a piece of Basic White card stock to measure 6.8cm x 10.2cm
  4. Cut another piece of Basic White card stock to measure 6.6cm x 10cm
  5. Rub the Apple Papaya ink on the top of a piece of acetate and then Polished Pink ink below. Then use a water spritzer to spread the ink by spraying a small amount over both inks. Using the smaller piece of Basic white card stock push this into the ink on the acetate to pick up the colour. Allow it to dry. You can help it dry by using your Heat Tool.
  6. Once the ink is dry stamp the floral image from the Blessings of Home stamp set in Versamark™ink then sprinkle on some white embossing powder and set with the heat tool
  7. Glue the image layer to the slightly larger piece of Basic White card stock and adhere this to the from to the card using Dimensionals
  8. On a 7.5cm x 1cm piece of Basic Black card stock stamp the sentiment in Versamark™ink then sprinkle on some white embossing powder and set with the heat tool
  9. Cut a 9.5cm length of the Gold Fine Art Ribbon and glue this behind the sentiment layer. Pop both these layers up on Dimensionals and adhere to the card front on the bottom third of the image layer


Many thanks for stopping by to read my blog post today.
I hope you like the gorgeous blooms from the Blessings of Home stamp set as much as I do.

Have a creative week!


Product List