Monday 30 November 2020

Stampers Showcase Blog Hop Winter/Holidays Theme


Hello and welcome to the Winter/Holidays themed Stampers Showcase Blog Hop!

What a year it has been and it is hard to believe that Christmas and the New Year is almost upon us.

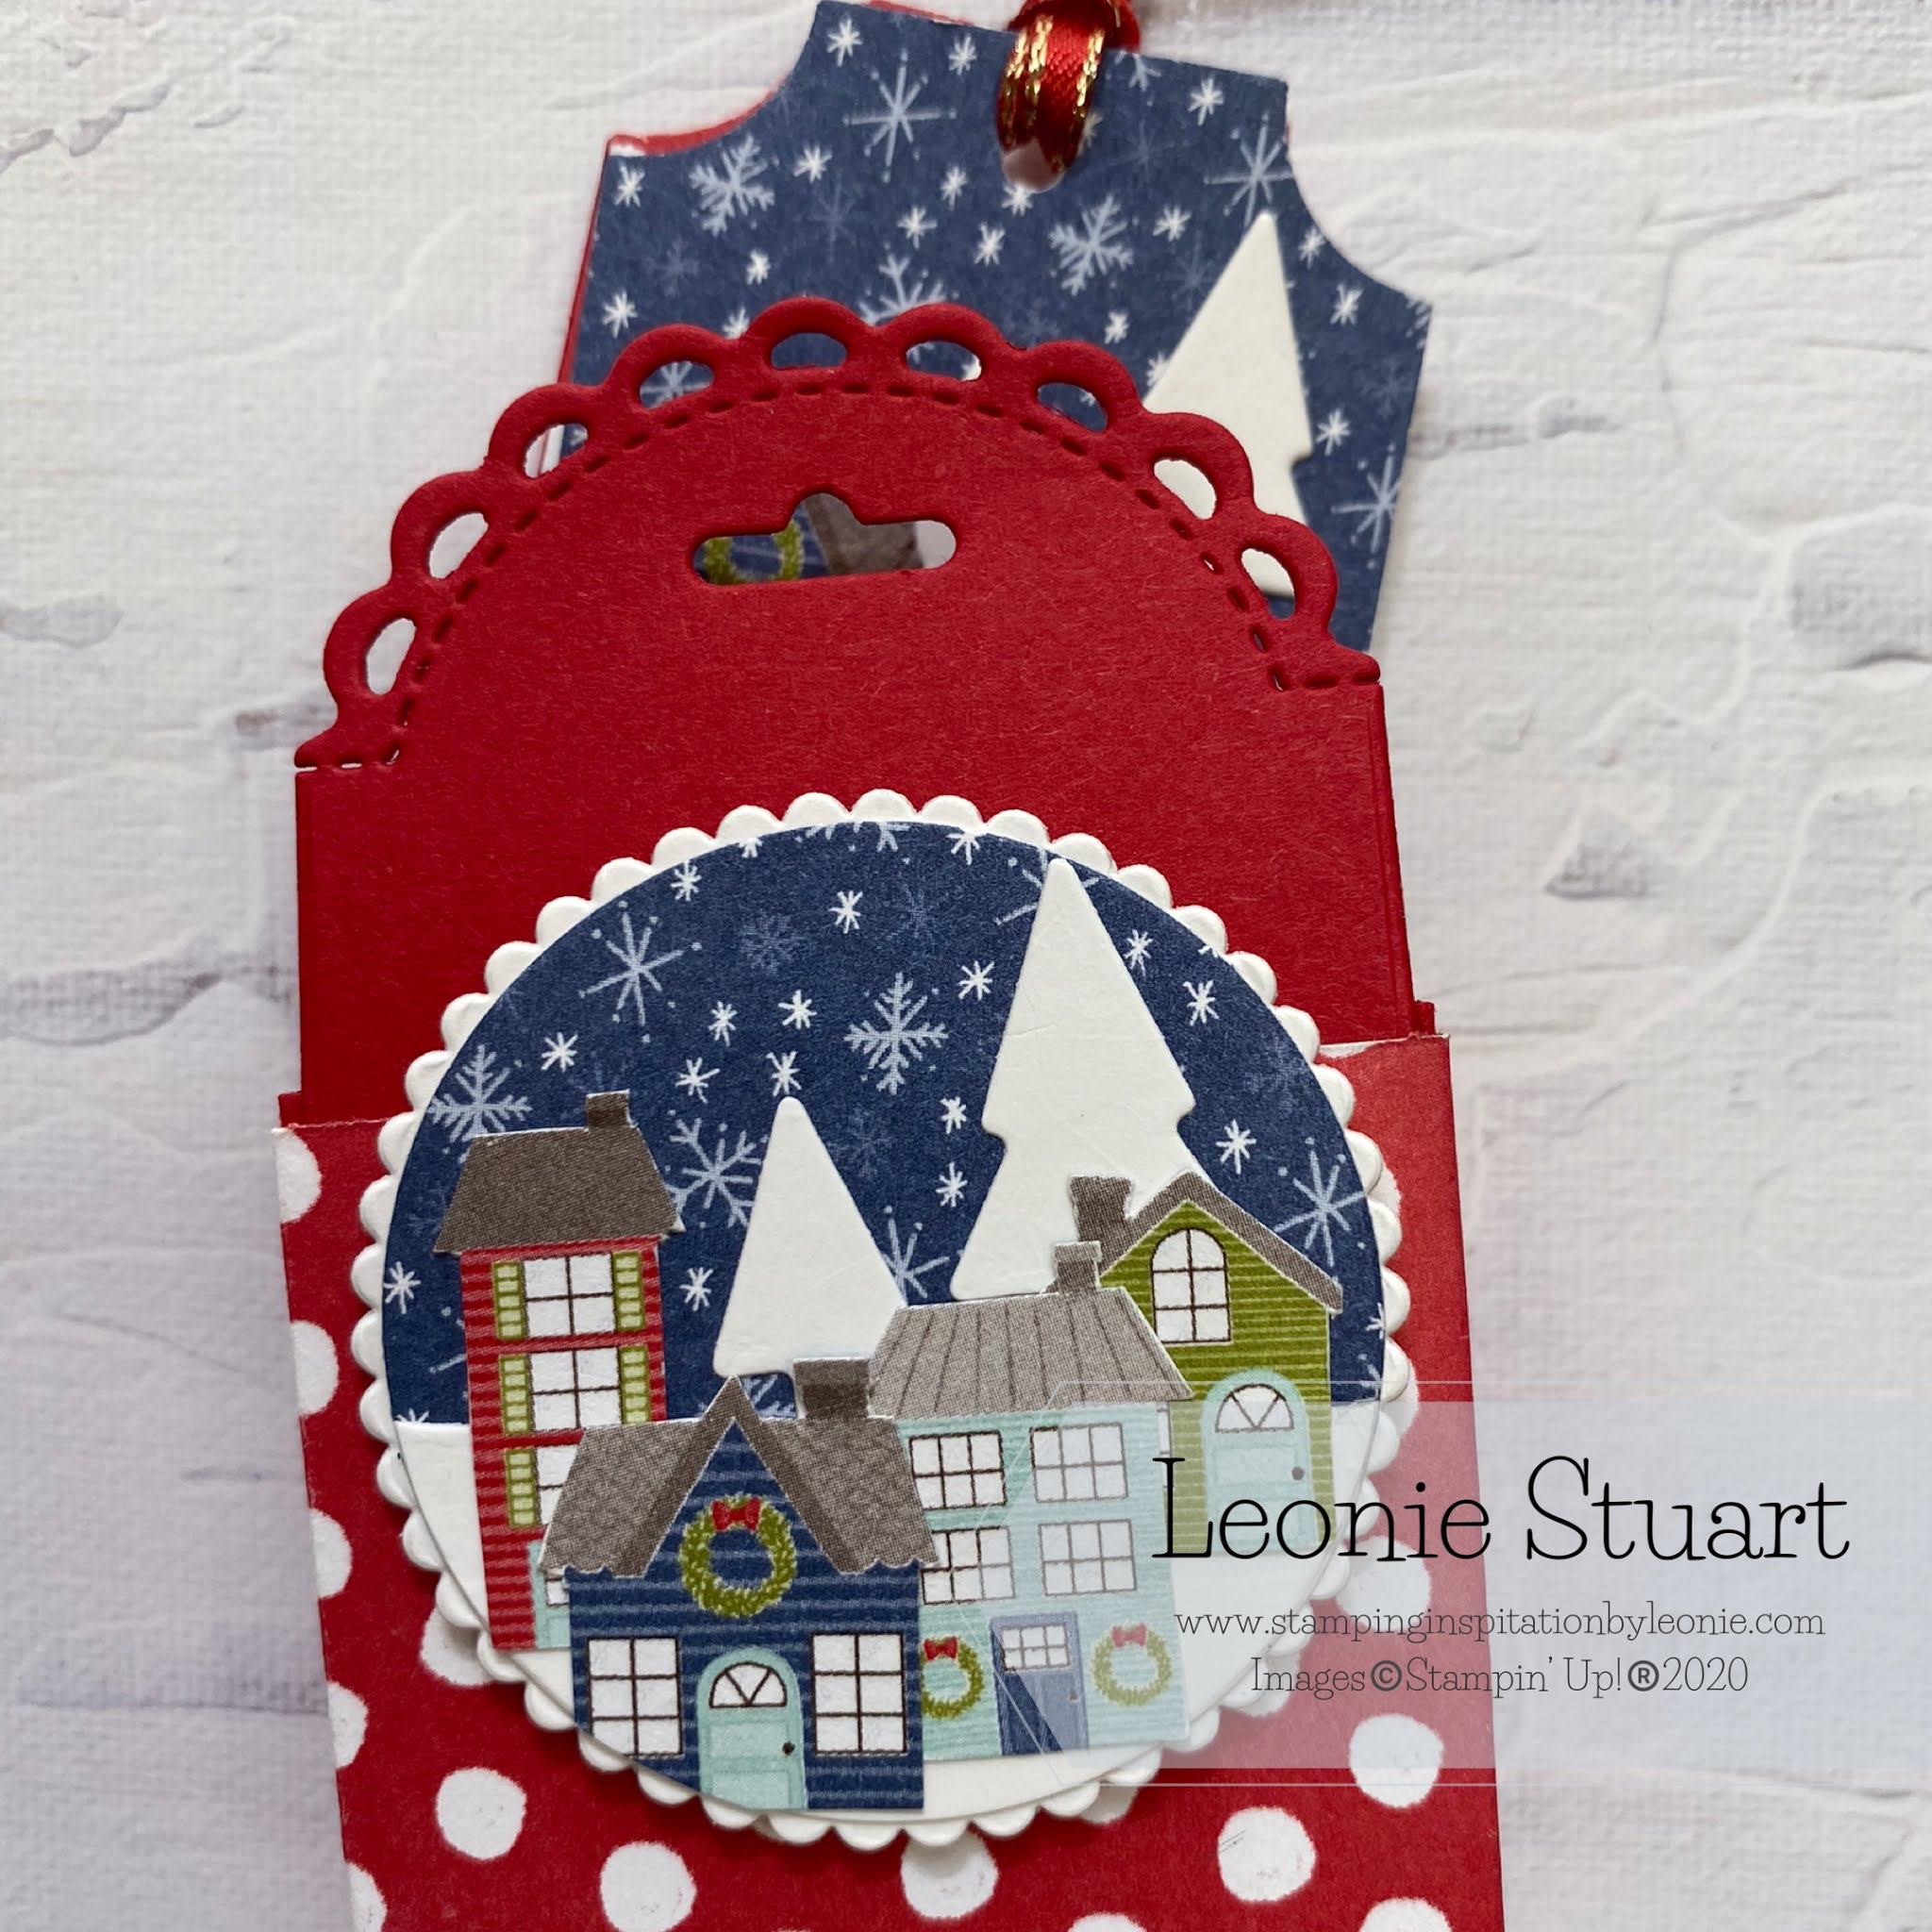
I mostly create cards but for this challenge I wanted to make some 3D items and Christmas tags. During this process I discovered that the Essential Tag Punch created tags that fit perfectly into the very sweet little treat box from the Little Treat Box Dies! I was so excited!


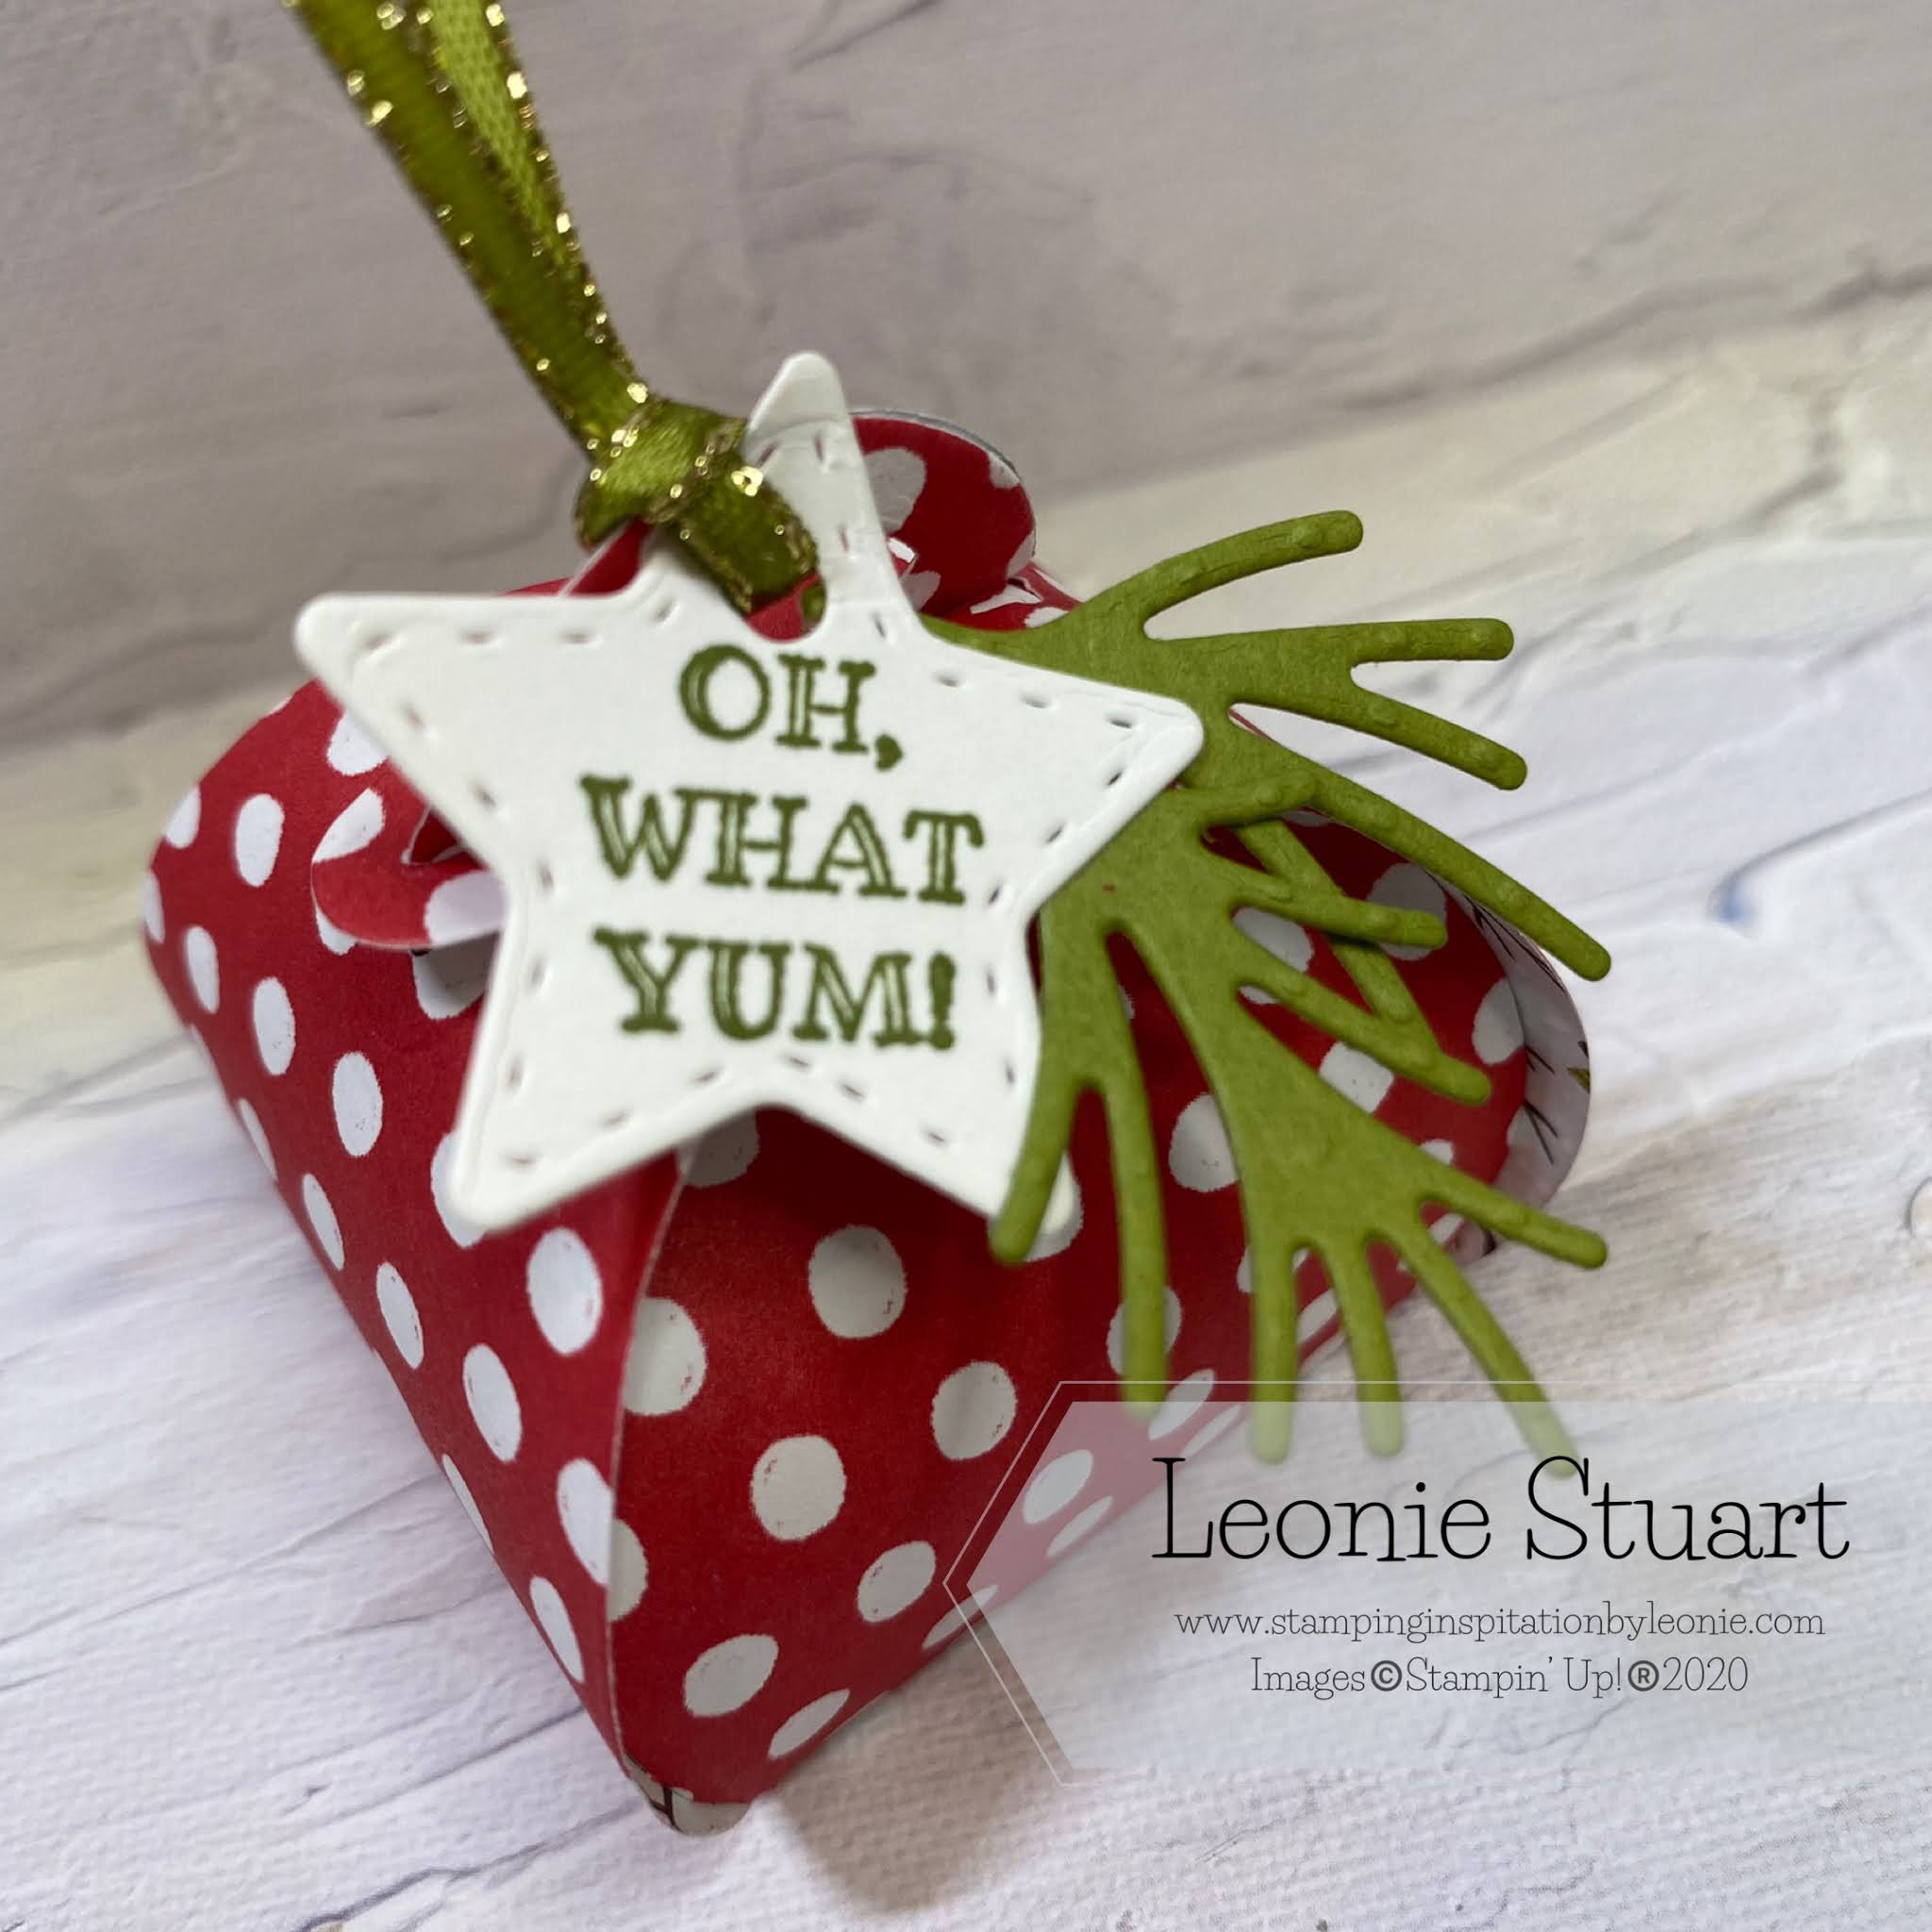
I have also create a cute gift with the Mini Curvy Keepsakes Box Dies to coordinate with the Little Treat box.


Here are the three items side by side. I have used the very sweet Trimming the Town suite for these items and the Itty Bitty Christmas stamp set for sentiments.


My creations are very easy to create. I have fussy cut all the tiny houses and used the Blue starry DSP for the sky and Whisper White card stock for the trees and foreground cut with the Home Together dies. Gluing all together before using the Essential Tag punch and the Layering Circle Die to cut the shape. The Layering Circle Die will sit on the Scallop Circle from the Little Treat Box Dies. The tag has another tag cut from the spotty DSP sitting behind to help coordinate with the other items.

The spray of greenery and the tag on the Curvy Keepsake box are all included with the Curvy Keepsakes Dies set. Lots of options to decorate this cute little keepsake. Perfect for each guests place at the table on Christmas Day.

I really enjoyed making each little item for this challenge. Each individual one took just minutes to put together.  I plan to make more for the Christmas table and customer thank you gifts. You can see the products that I used at the bottom of my post. All available in my online store too!


Up next on our blog hop is the very lovely and talented Jessica Brigden!
She will have something wonderful to share with you! 
Click on the button below to go to her page!


Many thanks for visiting my blog today! You are appreciated greatly. I hope to inspire you to create for the upcoming festive season and wish you well at this time.


Product List

Wednesday 25 November 2020

Colour INKspiration #90


Hello and welcome to Colour INKspiration #90!


The inspiration photo is such a gorgeous photo. I hope it is getting you in the mood for the festive season. It is fast approaching and I am enjoying creating some Christmas Cards. For this challenge, however, I have made a sweet baby shaker card using the Zoo Globe stamp set.


You can read how this came together below.


  1. Cut a Pretty Peacock card base to measure 21cm x 14.9cm scored and folded in half.
  2. Cut another piece of Pretty Peacock card stock to measure 10cm x 14.4cm.
  3. Use the globe die from the Snow Globe scenes die cut a globe out of the 10cm x 14.4cm pice of card stock at the top of the card stock.
  4. Run the area below the die cut piece through the Stampin" Cut & Emboss machine using the weave look embossing folder from the Wrapped in Texture Embossing Folders.
  5. Stamp the elephant, balloons, globe and globe base in Tuxedo Black Memento™ink on a piece of Whisper White card stock. Fussy cut all pieces with paper snips except the globe and globe base which you can use the die cut.
  6. Colour the elephant in with the Dark Pool Party Stampin' Blends Marker.
  7. Colour the Globe in with light Pool Party Stampin' Blends Marker.
  8. Colour the Balloons in with Daffodil Delight and Petal Pink Stampin' Blends Markers. And the Coastal Cabana Stampin' Write Marker.
  9. Colour the base of the Globe in with the Dark Pretty Peacock Stampin' Blends Marker.
  10. Use the Daffodil Delight Stampin' Blends Marker to colour the Whisper White crinkled seam binding ribbon. It will dry very quickly. Secure the ribbon around the bottom of the globe and the top of the embossed area using tear n' tape at the back.
  11. Secure the Shaker Dome to the back side of the die cut Pretty Peacock piece of card stock by removing the tape and holding in place for a few seconds. 
  12. Using Dimensionals secure the elephant and the balloons to the coloured base of the globe.
  13. Select a small amount of Pretty Peacock sequins from the Woven Threads sequin assortment and Pool Party sequins from the Whale of a time sequins. Place these in the dome. Then place the coloured globe with the elephant and balloons inside the dome.
  14. Remove the tape of the back of the dome and secure this to the card base and use glue to secure the other areas.
  15. Using dimensionals place the globe base at the bottom of the globe and on top of the ribbon. Using a glue dot secure some coloured ribbon tied in a bow on the right hand side of the globe base.
  16. Stamp the Sweet Baby sentiment on a piece of Whisper White card stock in Pretty Peacock ink and using your paper snips create a banner. Glue this to the left lover side of the card.


INKspired to join the challenges? It's so very easy. Firstly, get some INKspiration by checking out all of the creations of the Colour INKspiration Crew in the challenge album on our Facebook page. Then you have 12 days from today to make and upload your creation to the Facebook Colour INKspiration Group. You don't have to have a blog to participate but if you do you can link back to your post. Make sure you use all of the challenge colours. You can also use neutrals such as Whisper White, Very Vanilla, Crumb Cake, Sahara Sand and Basic Black as well as Metallics.

Not a member of the Colour INKspiration Facebook group yet? Just click here and ask to join Colour INKspiration, add the group to your favourites and share it with your crafty friends so they can join in the fun too. Make sure you answer the questions when you are prompted We can't wait to see what you create with these gorgeous colours.

Many thanks for visiting my blog today. 

I enjoyed creating this card and imagine it will suit either a baby boy or baby girl.

Hope you are getting on well and have started to think about Christmas. It will be a difficult time for so many this year. Make sure you reach out to those people and let them know you care even if it is only a short conversation. Or send them a card to let them know they are in your thoughts.

Have a great week! 


Product List

Wednesday 11 November 2020

Colour INKspiration #89


Hello and welcome to my blog post for CI #89!

A lovely photo that reminds me of an Australia Christmas for this challenge! I would love this sitting at my front door for Christmas. Well all year round for that matter!


I recently purchased the "A Merry Hello" hostess stamp set and couldn't create with it quickly enough as it is really sweet!


  1. Start with a Shaded Spruce card base measuring 21cm x 14.8cm scored and folded in half
  2. Cut another piece of Shaded Spruce to measure 10cm x 14.3cm. Run this piece through the Stampin' Cut & Emboss machine with the Wrapped in Texture Embossing folder with the spots grouped in fours.
  3. Glue this to the front of the card base.
  4. Using the Stitched Rectangle dies cut one piece of Just Jade card stock using the 6.5cm x 10cm die
  5. Cut a piece of Gray Granite cards stock to measure 9.5cm x 6cm. Glue this to the Just Jade piece.
  6. Using the Stitched Rectangle dies cut a piece of Whisper White card stock with the 9cm x 5.5cm  die.
  7. On the Whisper White die cut shape stamp the bottom of the stocking in Poppy Parade ink and the top in Shaded Spruce. Filling the dots in on the top of the stocking with Poppy Parade ink.
  8. Colour the bottom of your stocking with Poppy Parade Stampin' Blends.
  9. Glue this layer onto the Gray Granite layer
  10. Stamp the sentiment  in Shaded Spruce on a small piece of Whisper White card stock to measure 4.5cm x 1cm. Use your paper snips to banner the ends.
  11. Lay two 10cm lengths of the Poppy Parade ribbon down centrally on your card base secure with Tear & Tape. Cut the ends on an angle.
  12. Pop the three layers with the stocking at the top up on dimensionals and secure to the front of the card.
  13. Pop the sentiment up on dimensionals and secure to the lower right hand side of the stocking.

I hope you like my stocking Christmas card. It was quick to colour and create with!

Below is a link to the other crew who have blogged their creations if you want to visit their posts and see their gorgeous creations! 

Colour INKspiration Crew:
Monica - Guest Designer

The Joy to the World  Paper Pumpkin™ is now available for customers to purchase. It is a one of a kind Paper Pumpkin™ kit is available while stocks last in Australia. It is available worldwide too! It will be a popular kit with beautiful sentiments and a wreath to decorate. Everything is included in the box from stamps, ink, adhesive, card bases to twine and die cut images and sentiments!


Who wouldn't love to create elegant Christmas cards with this beautiful kit. Those that will receive this cards will just treasure them. It is sure to get you in the festive mood too. 

Joy To The World Paper Pumpkin™ kit
AU $37 (plus P & H)
Item number 155876

You can click on the Joy to the World image below and go straight to my online store to purchase this kit or any other products you wish!

I hope you are creating for Christmas this year. Hand crafted gifts are just so special.

Thank you for visiting!

You are appreciated


Product List
Paper Snips
[103579]
$17.00