Monday 28 June 2021

Stampers Showcase Blog Hop | Summertime Florals


Hello and welcome to the June Stampers Showcase Blog Hop!

This month we have a lovely theme

Summertime Florals

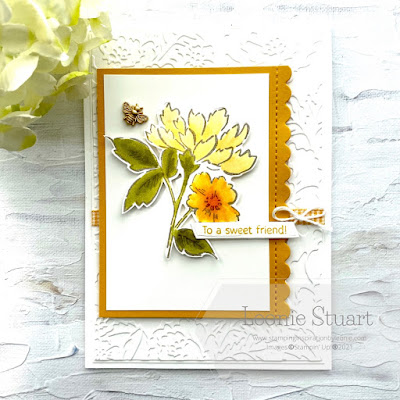
I love the thought of Summertime florals especially as we are in the middle of winter here in Australia. I have chosen a sunny colour palette for my card to bring some sunshine into my creation. I have used the Hand - Penned bundle as it is a perfect summertime flower stamp set.


  1. Start with a Basic White card base measuring 21cm x 14.9cm scored and folded in half
  2. Cut another piece of Basic White card stock to measure 14.3cm x 10cm for a mat layer
  3. Cut another piece of Basic White card stock to measure 9.8cm x 14.1cm and emboss this with the Pretty Flowers Embossing Folder. Glue this to the mat layer
  4. Cut another piece of Basic White card stock to measure 7cm x 10cm for the layer on top of the Bumblebee layer
  5. Cut a piece of Bumblebee card stock to measure 8.5cm x10.5cm and use the scallop die on the long side to create decorative edge
  6. Stamp the floral image on a piece of Basic White card stock in Gray Granite ink. Colour the image in with Old Olive, Daffodil Delight and Mango Melody Stampin' Blends. Die cut this image then secure floral die cut image to the  7cm x 10cm piece of Basic White card stock using Dimensionals. Glue this to the Bumblebee decorative edge layer
  7. Stamp the sentiment from the Sweet as a Peach stamp set in Bumblebee on a piece Basic White card stock die cut with the coordinating die from the Sweet as a Peach Bundle. Or trim with your paper snips. Any small to medium sentiment would work
  8. Run a length of the Gingham Bumblebee ribbon around the centre of the card securing at the back with Stampin' Seal+. Then run a piece of the White Twine on the top of this securing in the same way. Tie another small length of twine in a bow on the right hand side of card
  9. Use Dimensionals to secure the Bumblebee and floral layer to the top of the Ribbon
  10. Use Mini Dimensionals to secure the sentiment to the right hand side of the flower
  11. Use a Glue Dot to secure the sweet little Bee to the top left hand side of the card

My very talented friend Annette Ball  is up next. Please click on the next blog button below to go to her blog post. I am sure that she has something wonderful to share with you for this months theme!


Thank you so much for visiting my blog today....You are appreciated!


Product List

Wednesday 23 June 2021

Colour INKspiration #102


Hello and welcome to my blog post for Colour INKspiration #102!

We have a lovely Australian image for our colour palette this challenge.  So pretty!
This image was chosen by lovely crew member Lou Kitzelman.

We welcome Deette Beynon as our guest designer this challenge. Make sure that you check out the crew and Deette's project on our Facebook page here.We would love you to join us for the challenges and you can do that by heading to our Facebook page and requesting to join the group there. Make sure you answer all the questions. You can join in the fun by submitting your projects for each challenge. You don't need a blog to participate either. It is a whole lot of fun to play along!


For this challenge I have created a simple card. You don't always have hours to spend creating. I made this card in less than 30 minutes and it would be perfect as a Birthday, Thanks, Sympathy, Thinking of You Or Wedding card. This card would suit most occasions. You could create it and leave the sentiment for later when you have an occasion.


  1. Start with a Smokey Slate card base measuring 21cm x 14,9cm scored and folded in half
  2. Cut another piece of Smokey Slate to measure 10.2cm x 14.5cm for a matt layer
  3. Cut a piece of Basic White card stock to measure 10cm x 14.3cm 
  4. In Basic Gray ink stamp the floral image in the top left hand corner of the Basic White piece of card stock twice. You may need to stamp the image again to fill in the gap in the top left corner if necessary.
  5. Stamp the sentiment in Basic Gray ink on the right hand side of the card
  6. Die cut the floral piece in Polished Pink card stock with the coordinating die and glue to the top left hand side of the card with a small amount of multipurpose glue
  7. Tie two 13cm lengths of White Twine around the centre of the card and secure at the back with Stampin' Seal+. Tie another piece of twine in a bow on the right hand side of the twine.
  8. Secure three of the Polished Pink In Colour Jewels to the front of the card
  9. Glue the Basic White layer to the 10.2cm x 14.5cm matt layer of Smokey Slate card stock
  10. Pop the front layers up on Dimensionals and the secure to the card base


Tomorrow there is FREE SHIPPING for one day only!!!

 Orders must be over $45. A good opportunity to stock up on those supplies like card stock, glue, DSP, ribbon etc. Contact me or go to my online store to order. Link to store on the right!

Many thanks for stopping by today. Your support is greatly appreciated!

Have a creative week friends


Product List

Sunday 13 June 2021

Stamping INKspirations Blog Hop | Splish, Splash, Splish, Splash!


Welcome to my blog post for the Stamping Inkspirations Blog Hop!

Each month this amazing blog hop group create some beautiful projects to inspire your creativity. We are from all corners of the globe and love to get together to create with a theme.

We have such a fun theme this month!!!!

Splish, Splash, Splish Splash!

I love creating cards with a water theme. I have used the Whale Done stamp set with the Whale Builder Punch for this months project. I had to have this bundle as soon as I saw it in the catalogue last year. The images lend themselves to both underwater and nautical themes and work well with other stamp sets in the catalogue too!


  1. Start with half a piece of Fluid 100 card stock and create the watery background using Bermuda Bay and Coastal Cabana Ink. I used a water painter to spread ink on my card stock from an acrylic block. I dried the  Fluid 100 card stock with my heat tool and set aside
  2. Cut a card base of Coastal Cabana measuring 14.9cm x 21cm scored and folded in half
  3. Cut another piece of Coastal Cabana card stock to measure 14.3cm x 10cm. Using the 10cm x 6.7cm stitched rectangle die cut the centre out of this piece of card stock
  4. Stamp the whale in Night of Navy ink on a piece of Coastal Cabana card stock and punch out. Stamp a large and small seaweed in Shaded Spruce ink on Coastal Cabana card stock and fussy cut both out
  5. Stamp the school of fish in Shaded Spruce ink on the watery background
  6. Adhere the frame to the background layer using Dimensionals to pop it up. Then secure this to the card base with glue
  7. Pop the Whale up on Dimensionals and adhere to the background layer
  8. Glue the large piece of seaweed to the right hand side of the frame and then glue the smaller seaweed behind the larger seaweed
  9. Stamp the sentiment in Night of Navy ink on Basic White card stock. Trim with Paper Snips and use Dimensionals to adhere to the right hand side of the frame
  10. Adhere two of the Coastal Cabana sequins from the Artistry Blooms Sequins above the Whale to look like air bubbles


Up next on our blog hop is the very talented Libby Fens. Click on the next blog button to head to her blog post for more amazing inspiration.


Full list of blog hop participants


Thank you for visiting my blog today. 

I hope that I have inspired you to do something creative today!


Product List