- Start with a Starry Sky card base measuring 21cm x 14.9cm scored and folded in half
- Cut a piece of the Orchid Oasis card stock to measure 10.3cm x 14.6cm and glue this to the card front
- Cut a piece of Basic White card stock to measure 10cm x 14.3cm. Run this through the Cut & Emboss Machine with the Brick and Mortar Embossing Folder. Glue this to the card front
- Die cut a stitched Circle from the Tahitian Tide DSP with a circle from the Stylish Shaped Dies. Adhere to the card front using Dimensionals
- On a piece of Basic White card stock use a Blending Brush and Sweet Sorbet ink to colour the card stock. Stamp the rose in Sweet Sorbet ink and Die Cut with the coordinating Die
- On a piece of Basic White card stock use a Blending Brush and Parakeet Party ink to colour the card stock. Stamp two leaves in Parakeet Party ink and Die Cut with the coordinating Die
- Arrange the rose and leaves on the right hand side of the stitched circle and adhere with glue and Dimensionals
- Tie a 15cm length of the Tahitian Tide Metallic Woven Ribbon in a double bow. Adhere to the right hand side of the stitched circle on top of the rose using a glue dot
- Stamp the sentiment in Starry Sky ink on a 1cm x 10cm length of Basic White card stock. Trim with Paper Trimmer. Adhere to the front of the card on the top of the rose and rincon using Dimensionals
Monday 30 May 2022
Stampers Showcase Blog Hop - New 2022 In Colour!
Wednesday 25 May 2022
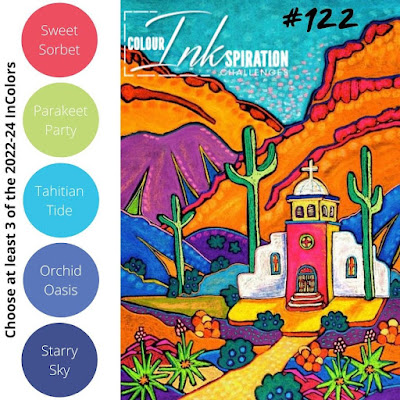
Colour INKspiration #122
Hello and welcome to the Colour INKspiration #122 Challenge.
Twice a month the crew get together to create to a colour palette inspired by an image chosen by a crew team member. This months image below was chosen by lovely crew member Monica Formosa. What a gorgeous image!
- Start with a Starry Sky card base measuring 21cm x 14.9cm scored and folded in half
- Cut a piece of the floral Starry Sky Designer Series Paper to measure 9cm x 13cm
- Glue this on an angle on the card front
- Cut a piece of Basic White card stock to measure 8cm x 11.7cm. Use the holed edge die from the Blossoming Happiness dies to create a decorative edge along one long side of the Basic White card stock. Use dimensional to place this on an angle on the card front
- On Basic White card stock stamp the ladybug in Sweet Sorbet and Memento ™ Tuxedo Black ink. Stamp the leaf in Parakeet Party ink, The flowers in Orchid Oasis ink. Punch the Ladybug out and assemble. Fussy cut the leaf and the flowers
- Arrange the Ladybug, leaf and flowers on the bottom left of the Basic White layer and adhere using glue and Dimensionals
- Die cut the word thanks from Orchid Oasis card stock and the outline in Starry Sky card stock. Glue them together and adhere to the card front using glue
- Adhere 5 of the Tahitian Tide Matte Dots around the ladybug, leaf and flowers
Sunday 15 May 2022
Stamping Inkspirations Blog Hop - Sketch Challenge
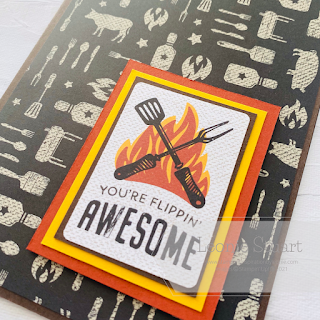
- Start with an Early Espresso card base measuring 21cm x 14.9cm scored and folded in half
- Cut the piece of DSP with the BBQ images to measure 10cm x 14.3cm and glue to the card front
- Cut a piece of Cajun Craze card stock to measure 5.5cm x 7.2cm
- Cut a piece of Crushed Curry card stock to measure 4.8cm x 6.5cm and glue this to the piece of Cajun Craze card stock
- Glue the die cut piece with the flame and BBQ tools to the top of the Crushed Curry and Cajun Craze layers
- Use DImensionals to pop the layered piece up on the bottom right of the card front
Angie McKenzie ● Aurélie Fabre ● Leonie Stuart
Karen Egan ● Terry Hamilton ● Rebecca-Jo Unwin
Gez Carpenter ● Tricia Butts ● Mo Rootes
Sue Allen ● Jan Musselman ● Marieke Bart
Jill Chapman ● Annette Ball ● Susan Webster
Karen Henderson ● Teri West ● Linda Moore
Rochelle Laird-Smith ● Jo Blackman ● Vickie Littlewood
Have a great week!
Wednesday 11 May 2022
Around the World on Wednesday Blog Hop - Sketch 101
Hello and welcome to another inspirational Around the World on Wednesday Blog Hop!
Each month a group of creative friends from all over the world get together for this Blog hop and create to a theme. Below is an image of where we all reside across the globe. So good to have a lovely bunch of crafty friends getting together each month!
- Start with a Basic White card stock measuring 21cm x 14.9cm scored and folded in half
- Cut a piece of Fresh Freesia Card stock to measure 9.5cm x 12.8cm
- Cut a piece of Basic White card stock to measure 9cm x 12.5cm. Use the detailed die to die cut the centre of the card stock. Glue this piece to the Fresh Freesia layering piece on an angle and leave to dry
- On a piece of Basic White card stock use Blending Brushes to colour the card stock in Fresh Freesia Ink. Then stamp the two large blooms in Fresh Freesia and die cut using the coordinating die
- On a piece of Basic White card stock use two Blending Brushes to colour the card stock in Granny Apple Green and Evening Evergreen Ink. Blend leaving brighter and darker areas. Then stamp the two different sets of leaves in Granny Apple Green ink and die cut using the coordinating die
- Assemble the flowers and leaves on the Basic White die cut piece and adhere with Glue and Dimensionals
- Adhere the layered pieces of the card front t the card base
- Cut a piece of Fresh Freesia card stock to measure 10cm x 2.5 cm. Cut a piece of Basic White card stock to measure 10cm x 2.3cm. Stamp the sentiment on the Basic White piece in Fresh Freesia ink and then glue both layers together. Place a Dimensional on each end and adhere to the centre of the card
- Tie a 20cm length of Linen Thread in a bow and adhere to the left hand side of the card with a Glue Dot
- Secure three White Classic Matte Dots around the blooms
Here is a list of all lovely folk participating in the blog hop
Colour INKspiration #121
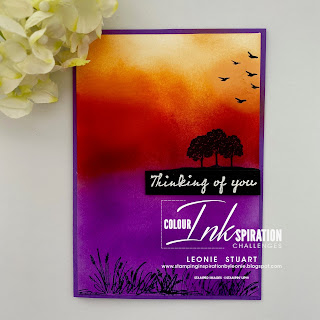
- Start with a Gorgeous Grape card base measuring 21cm x 14.9cm scored and folded in half
- Cut a piece of Basic White card stock to measure 10cm x 14.3cm
- Use Blending Brushes to create the background. The order starting from the top is Pale Papaya, Pumpkin Pie, Poppy Parade then Gorgeous Grape. I coloured almost half of my page in Gorgeous Grape to put the trees half way up
- Stamp the trees, birds and reeds at the bottom in Memento ™ Tuxedo Black ink and adhere this layer to the card front
- Cut a piece of Basic Black card stock to measure 6.5cm x 1.2cm. Stamp the sentiment in Versamark™ ink, sprinkle with White Embossing Powder and set with the heat tool. Adhere to the card front below the trees using Dimensionals