
Hello and welcome to the Stamping Inkspirations Blog Hop for March!
I love this months theme of Embossing Techniques!! I decided to challenge myself to create a card with Embossing Techniques that I don't often use. I decided to use a decorative mask and Embossing Paste and also Heat Emboss an image in White on coloured card stock. It was fun creating this card starting with the embossed background layer and then deciding what to put on top. Here is my completed card.
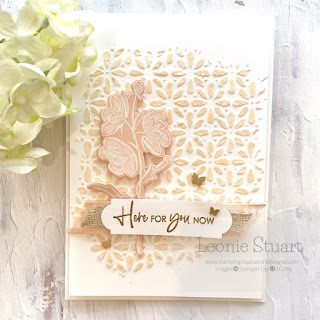
- Start with a Basic White card base measuring 21cm x 14.9cm scored and folded in half
- Cut a piece of Basic White card stock to measure 10cm x 14.3cm
- Using a Palette Knife mix a tablespoon of the Embossing Paste with 1 drop of the Petal Pink ink on your silicone mat. Ensure that the colour is evenly mixed
- Secure your Basic White piece of card stock with tape and the floral Decorative Mask secured over the top. Spread the mixed embossing paste over the top of the mask using the Palette Knife. I have spread the embossing paste in the centre of the piece of Basic White card stock. Set aside to dry. Once dry use dimensionals to adhere to the card base
- Stamp the flower in Versamark™ ink on a piece of Petal Pink card stock. Sprinkle with White embossing powder and set with the heat tool. Colour the petals of the flower with a White Stampin' Chalk Marker. Die cut using the coordinating die. Secure to the card front using Dmensionals
- Stamp the sentiment in Versamark™ Ink on a strip of Basic White card stock.Sprinkle with Gold Embossing Powder and set with the heat tool. Trim closer to the letters and use Treasured Tag Punch to cut both ends
- Cut a 10cm length of the Petal Pink Organdy Stripe Ribbon and a 9.5cm length of the Fine Art Ribbon. Secure both together with Tear n' Tape and adhere across bottom of the flower stem using Dimensionals. Then using Tear n' Tape to secure the sentiment abel to the top of the ribbons. Banner both ribbons at the ends
- Secure three Brushed Brass Butterflies to card front
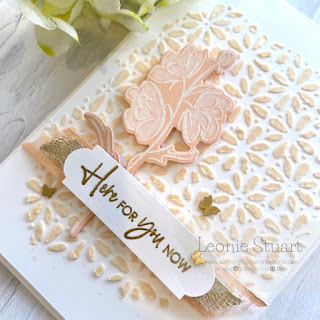
This was a fun way to create the background layer and colour the stamped image to make the Embossed image pop. It is something that I definitely will try again.
Up next on our blog hop is the very talented Tricia Butts.
Make sure that you click on the next blog button to head to Tricias's post for more inspiration

Angie McKenzie ● Aurélie Fabre ● Jill Chapman
Jo Blackman ● Leonie Stuart ● Tricia Butts
Karen Henderson ● Mo Rootes ● Jan Musselman
Susan Webster ● Sue Allen ● Chris Smith
Teri West ● Gez Carpenter ● Danielle Kassing
Have a great week friends!
 |  |  | |
 |  Fine Art Ribbon") |  | |
 |  | ||
 |  |  |  |
 |  |  | |
 |  |  |  |

 Organdy Striped Ribbon")


Such a soft pretty card Leonie, love it x
ReplyDeleteGorgeous in it's sweet simplicity!
ReplyDeleteAbsolutely breathtaking, Leonie! Love everything about it from the color palette to the two different embossing powders and the custom color embossing paste. Thanks for the inspiration and for hopping with us. xx
ReplyDeleteLovely. I don't use the embossing paste, I just don't have much luck with it. But you have inspired me to try again.
ReplyDeleteGorgeous card! love the color palette and your background!
ReplyDeleteGorgeous!! I love the soft colours, looks fabulous xx
ReplyDeleteVery pretty card! It is so elegant, I love it!
ReplyDeleteThis card would be wonderful for a wedding invitation! Elegant, soft, delicate. It's really perfect!
ReplyDeleteAbsolutely gorgeous Leonie! 💕Thanks for sharing!
ReplyDeleteBeautiful Leonie! TFS
ReplyDeleteSimply beautiful card design. Love the way you have used the embossing paste.
ReplyDelete