

Hello and welcome to another Stamping Inkspirations Blog Hop.
This month the crew have been making fun fold projects. I do love a fun fold and instantly thought of the On The Horizon Bundle with the beautiful coordinating Designer Series Paper. I think this might be one of my most favourite papers ever. It certainly needs little done to it to make it look stunning. Below is my fun fold card. I have created this card in inches as it was easier to work with.

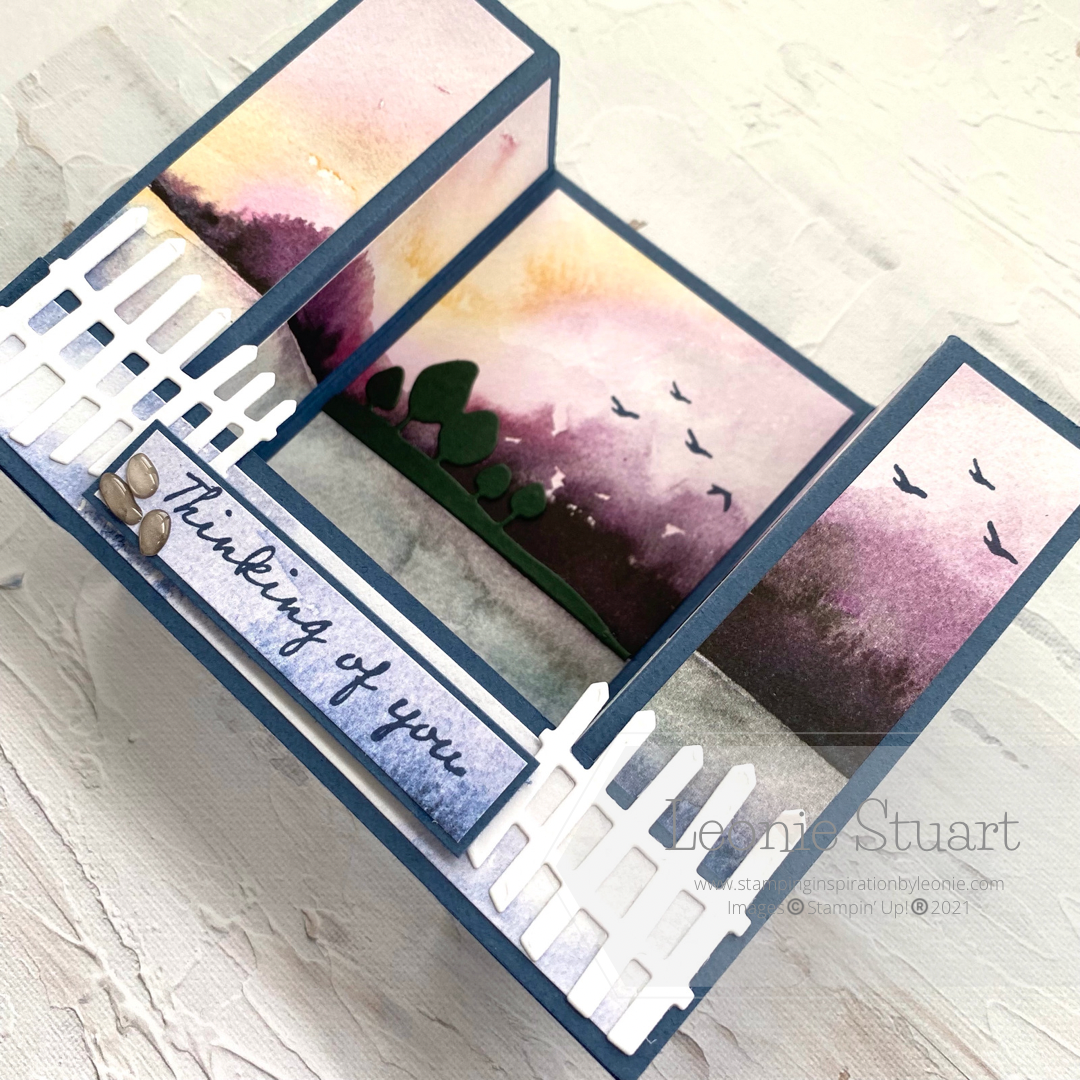
- Start with a card base measuring 8" x 4 1/4" in Misty Moonlight card stock. Score along the long side at 1 1/4, 2 1/2, 5 1/2 and 6 3/4'. Burnish along the score lines as shown in image of card. Middle lines towards the centre and both outer score lines outwards.
- Cut another piece of Misty Moonlight card stock to measure 1" x 51/2 ". This is for the piece that goes goes across the front that hold the card together
- I used two pieces of the New Horizon Designer Series Paper for my project. I cut the DSP to measure 4" from the top of the DSP. From the left hand side of the DSP cut one piece 1" X 4". Cut the second piece 1" x 4". Cut the Third Piece for the centre of the card to measure 2 3/4" x 4". Then go on to the second piece of DSP and from the right hand side cit two pieces to measure 1' x 4". This makes the scene look seamless and not chopped. Glue all the DSP pieces to the card base
- Stamp the birds to the card front using Misty Moonlight ink
- Die cut the tree layer from Evening Evergreen card stock and glue to the centre panel as in image
- From the bottom piece of DSP that you cut off cut a piece to measure 5 1/4" x 3/4". Glue this to the 1" x 51/2 " piece of Misty Moonlight card stock before glueing to the card front by placing glue on the bottom of the card front outer flaps. Making sure it is square on with the bottom of the flaps and holding until set.
- Die cut the fences in Basic White card stock and glue to the card front as shown
- Cut a piece of the spare DSP to measure 2 3/4 x 1/2". Stamp the sentiment in Misty Moonlight ink. Cut a piece of Misty Moonlight card stock to measure 2 7/8" x 5/8" and glue the sentiment layer to this. Then glue to the bottom of the card base as in image. Secure three of the Pebbles Enamel Shapes to the left hand side of the sentiment

I hope you like my fun fold card for this months theme. I love how it turned out and can't wait to post it to someone.
Up next on our blog hop is the talented Karen Henderson.
Make sure that you click on the net button to head to Karen's blog post then hop around to see all the crews projects for some amazing fun fold cards.

Angie McKenzie ● Tricia Butts ● Aurélie Fabre
Karen Egan ● Teri West ● Gez Carpenter
Susan Webster ● Rochelle Laird-Smith ● Sue Allen
Jill Chapman ● Leonie Stuart ● Karen Henderson
Mo Rootes ● Rebecca-Jo Unwin ● Danielle Kassing
Vickie Littlewood ● Marieke Bart ● Linda Moore
Robbie Susan Chandler ● Terry Hamilton
Jan Musselman ● Kimberley Morris
Take care!

") |  |  | |
 |  |  |  |
 |  |  |  |

Absolutely gorgeous card, Leonie!Thanks for the sharing!💕
ReplyDeleteJust gorgeous
ReplyDeleteVery pretty card x
ReplyDeleteGreat use of the DSP and dies - the fences make a fabulous bridge for this card - love it!
ReplyDeleteOh Leonie that's awesome! I was just thinking of using my Horizon paper before it left us and this card is just perfect! The folding gives depth to the landscape, it's really ideal! Thank you for this fantastic sharing! xX
ReplyDeleteStunning card Leonie, Thanks for sharing.
ReplyDeleteAppreciiate your blog post
ReplyDeleteThanks ffor this
ReplyDelete