
Wednesday, 10 November 2021

Around the World on Wednesdays - Favourite Month


Hello and welcome to the Around the World on Wednesday blog hop for November.

Each month the amazing team, pictured below, from all over the world create a project for a common theme. This months theme is Favourite Month!



Now there are many months in the year and to narrow it down was fun. I love my birthday month, I love the first month of Spring and I love the month of February, life calms after the festive season, the children return to school and the whole year lay ahead of you. But I love December when there is Christmas music playing in shops, you are looking to thank those that have made a difference in your life with a card or a gift, friends and family come together to celebrate and most people holiday. This year getting together will be so important.

I have made my card using modern festive colours and have included the Merry Melody embossed layer to represent Christmas music and the Christmas tree to represent assembling and decorating the Christmas tree. Both things I love about Christmas. So here is my card!


  1. Start with a Mint Macaron card base measuring 21cm x14.9cm scored and folded in half
  2. Cut a piece of Mint Macaron to measure 10cm x 14.3cm and glue this to the front of the card base
  3. Cut a piece of Mint Macaron to measure 12.8cm x 8.4cm
  4. Cut a piece of Basic White card stock to measure 12.4cm x 8cm. Run this through your Cut & Emboss machine with the Merry Melody embossing folder. Remember that this piece will be in landscape position. Then glue this to the piece of Mint Macaron to measuring 12.8cm x 8.4cm
  5. On a piece of Basic White card stock stamp the check Christmas tree twice in Mint Macaron ink and once in Blushing Bride ink. Punch all three out with the Pine Tree Punch. Adhere to the top of the embossed layer using Dimensionals
  6. On a 1cm strip of Mint Macaron card stock stamp the sentiment in Versamark™ ink, sprinkle with White Embossing Powder and set with the heat tool. Use paper snips to angle both ends and trim to desired length
  7. Tie a 15cm length of Linen Thread in a bow and adhere to the far right Christmas tree using a glue dot
  8. Glue the sentiment layer to the trees. I have not popped this layer up as I am not wanting a thicker card
  9. Pop the decorated layer up on Dimensionals and adhere to the card front
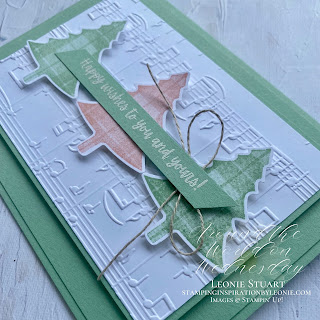


I hope you enjoyed reading how this card came together. It can be recreated without the layers and the trees stamped straight onto a piece of Basic White card stock to make it simpler and easier to mass produce.

Up next on our Around the World on Wednesday blog hop is the very talented Rochelle Laird-Smith

Please click on the button below to keep hopping to see the teams Favourite Month project!



Jan Clothier - NZ

Leonie Stuart - AU

Rochelle Laird-Smith - AU

Cheryll Miller - AU

Danielle Kassing - NL

Aurélie Fabre - FR

Mikaela Titheridge - UK

Tina Zinck - CA

Angie McKenzie - US

Wendy Lee - US

Chris Smith - US

Brenda Nelson - CA

Tricia Butts - US

Elaine de Montmorency - CA

Sharon Hashimoto Burkert - US

Teri West - US

Cheryl Hamilton - US


Many thanks for taking the time to visit my blog today. 

You are appreciated!

Take care

 

Product List

Colour INKspiration #111


Hello and welcome to the Colour INKspiration Challenge #111!

The crew would love you to join us for one of the challenges! It's so easy. Firstly, get some INKspiration by checking out all of the creations of the Colour INKspiration Crew in the challenge album on our Facebook page. Then you have 12 days from today to make and upload your creation to the Facebook Colour INKspiration Group. You don't have to have a blog to participate but if you do you can link back to your post. Make sure you use all of the challenge colours. You can also use neutrals such as Whisper White, Very Vanilla, Crumb Cake, Sahara Sand and Basic Black as well as Metallics. 

Not a member of the Colour INKspiration Facebook group yet? Just click here and ask to join Colour INKspiration, add the group to your favourites and share it with your crafty friends so they can join in the fun too. Make sure that you answer the joining questions. We can't wait to see what you create with these gorgeous colours.

This challenges inspiration image was chosen by the lovely crew member Nicole Wilson. I love the neutral colour palette and couldn't wait to create with the colours.


Here is my hello card using the beautiful colour palette!

I am going to share a tip to make your White Embossed sentiments look more Very Vanilla!


  1. Start with a Crumb Cake card base measuring 21cm x 14.9cm scored and folded in half
  2. Cut a piece of Evening Evergreen card stock to measure 9.2cm x 13.7cm
  3. Cut a piece of Soft Succulent card stock to measure 13.3cm x 9cm. Glue to the  9.2cm x 13.7cm piece of Evening Evergreen card stock
  4. Cut a 11cm length of the Evening Evergreen Chevron Weave Ribbon and tie around the layers above in the centre. Secure to the back using glue dots. Cut a 11cm length of Linen Thread and secure this to the centre of the  Evening Evergreen Chevron Weave Ribbon, securing to the back with a glue dot. Tie another length of Linen thread in a bow and secure to the right hand side of the card. Secure this to the linen thread on the right hand side
  5. Cut a piece of Evening Evergreen card stock to measure 7.4cm x 10.2cm
  6. Cut a piece of Very Vanilla card stock to measure 10cm x 7.2cm. Stamp the floral image in Soft Succulent ink in the top left and bottom right corners. Glue to the 7.4cm x 10.2cm piece of evening Evergreen card stock. Glue this layer to the Evening Evergreen card stock measuring 7.4cm x 10.2cm. Pop this layer up on Dimensionals and adhere to the card front
  7. Stamp the sentiment on a piece of Evening Evergreen card stock using Versamark™ink, sprinkle with White embossing Powder and set with the Heat Tool. Use the Ivory Stampin' Blend to colour over the White Embossing to make it more Very Vanilla than stark white. Die cut using the die from the Tasteful Labels Dies or use paper snips to create a banner. Secure the sentiment to the top right hand side of the floral layer using Dimensionals


Many thanks for stopping by today. You are appreciated!

Have a wonderful week.


Product List

Wednesday, 27 October 2021

Colour INKspiration #110


Welcome to another Colour INKspiration challenge!

The crew would love you to join us for one of the challenges! It's so easy. Firstly, get some INKspiration by checking out all of the creations of the Colour INKspiration Crew in the challenge album on our Facebook page. Then you have 12 days from today to make and upload your creation to the Facebook Colour INKspiration Group. You don't have to have a blog to participate but if you do you can link back to your post. Make sure you use all of the challenge colours. You can also use neutrals such as Whisper White, Very Vanilla, Crumb Cake, Sahara Sand and Basic Black as well as Metallics. 

Not a member of the Colour INKspiration Facebook group yet? Just click here and ask to join Colour INKspiration, add the group to your favourites and share it with your crafty friends so they can join in the fun too. Make sure that you answer the joining questions. We can't wait to see what you create with these gorgeous colours.

This challenges inspiration photo was chosen by my friend and crew member Liz Gross. Such a sweet image! Lovely colours to work with too!


Here is my Christmas card for this challenge using the Words of Cheer Bundle.


  1. Start with a Shaded Spruce card base measuring 21cm x 14.9cm scored and folded in half
  2. Cut a piece of Shaded Spruce to measure 13.3cm x 8.9cm for a matt layer
  3. Cut a piece of Basic White card stock to measure 8.7cm x 8.7cm and run this through your Cut & Emboss Machine with the Timber 3D Embossing Folder. Glue this to the Shaded Spruce matt layer
  4. Pop the embossed and Shaded Spruce layer up on Dimensionals and adhere to the card front
  5. Cut a 11cm length of the Pale Papaya and white woven ribbon, angle the ends and use glue dots to adhere tot he bottom third of the embossed Basic White layer. Allow it to go over the edge of the Basic White layer
  6. On a piece of Basic White card stock stamp the floral image in Memento™ Tuxedo Black ink. Colour the image with the Stampin' Blends. I have used the Dark Shaded Spruce for the holly leaves and the light Shaded Spruce for the foliage and Cajun Craze Stampin' Blends for the berries. I have used both Cajun Craze and Pale Papaya Stampin' Blends to colour the Poinsettia petals. Die cut this out with the coordinating die and pop up on Dimensionals and adhere to the lower third of the card front
  7. On a piece of Basic Black piece of card stock measuring 8.5cm x 1.3cm stamp the sentiment on Versamark™ink, sprinkle with White Embossing Powder and set with the Heat Tool. Banner the sentiment layer at the end and secure to the card front above the ribbon layer using Dimensionals
  8. Place five of the Shaded Spruce Rhinestones around the floral layer on the embossed layer


Thank you so much for visiting my blog post today. I hope you are able to play along with us or get inspiration from our FaceBook page too!

Have a great week!


Product List