Wednesday 28 September 2022

Colour INKspiration #130


Hello and welcome to the Colour INKspiration #130 Challenge.

Twice a month the crew get together to create to a colour palette inspired by an image chosen by a crew team member. This months image below was chosen by lovely crew member Lou Kitzelman. What a beautiful colourful image!


The crew would love you to join us for one of the challenges! It's so easy. Firstly, get some INKspiration by checking out all of the creations of the Colour INKspiration Crew in the challenge album on our Facebook page. Then you have 12 days from today to make and upload your creation to the Facebook Colour INKspiration Group. You don't have to have a blog to participate but if you do you can link back to your post. Make sure you use all of the challenge colours. You can also use neutrals such as Whisper White, Very Vanilla, Crumb Cake, Sahara Sand and Basic Black as well as Metallics. 

Not a member of the Colour INKspiration Facebook group yet? Just click here and ask to join Colour INKspiration, add the group to your favourites and share it with your crafty friends so they can join in the fun too. Make sure that you answer the joining questions. We can't wait to see what you create with 
these gorgeous colours.

I have used the awash in beauty suite for my card this challenge.  I have made the card in imperial as this suits the lattice die.


  1. Start with a Granny Apple Green card base measuring 8 1/2" x 5 1/2"score and fold in half
  2. Die cut the lattice die in Basic White card stock
  3. Cut the Granny Apple Green piece of Designer Series Paper to fit behind the lattice and glue together
  4. Tie a double length of the linen thread around the lattice layer securing at the back with Tear n' Tape then glue this layer to the card front to the card front
  5. On a piece of Basic White card stock stamp the two flower heads in Highland Heather, The two Stems and two leaves in Granny Apple Green and the two sprigs in Blackberry Bliss. Die cut using the coordinating dies
  6. Die cut two of the smaller sprigs in Vellum
  7. Using the Night of Navy Stampin' Write Marker place dots in the centre of the largest bloom
  8. Adhere the blooms, leaves, sprigs and stems using glue and Dimensionals to the card front
  9. Stamp the Sentiment in Versamark™ ink on a piece of Night of Navy card stock . Sprinkle while white embossing powder and set with the heat tool. Die cut using the Stitched Rectangle Die. Adhere to the card front using Dimensionals
  10. Tie a lengthy of the Linen Thread around two fingers five times and create a bow. Secure this to the card front using a Glue Dot™




Many thanks for stopping by today. I enjoyed this colour combination a lot and felt the card turned out quite fresh looking in the colours. I hope you will join the Colour INKspiration Challenges FaceBook page and enjoy creating with these colours too!!


Product List
Heat Tool
[129056]
$53.00
Paper Snips
[103579]
$19.25

Monday 26 September 2022

Stampers Showcase Blog Hop - Masculine Projects


Hello and welcome to the September Stampers Showcase Blog Hop.

This month we are making masculine projects. I know I never have enough masculine cards in my stash. I have been busy lately though, making some lovely cards for all the men in my life.

I settled on creating with the fabulous He's The Man Suite for my card. The die cut masculine elements are so easy and fun to create with.  There are varied elements to suit the man you are creating for....BBQ's, Kombi Vans, Vintage Cars, Beer Glasses, Tools and more!!


  1. Start with a Sahara Sand card base measuring 21cm x 14.9cm scored and folded in half
  2. Cut another piece of Sahara Sand card stock to measure 14.3cm x 10cm
  3. Die cut two of the diamond shaped elements from the All That Dies in Sahara Sand card stock and glue to the top left and bottom right of Sahara Sand matt layer and then glue this layer to the card front
  4. Cut a 9cm x 6.5cm piece of the diagonally striped Designer Series paper and glue it to the centre of the card front in a diagonal position. glue the two Early Espresso corner elements on the top right and bottom left of the DSP piece
  5. Glue the torn page element on top of the DSP layer an angle as in image above
  6. Use Dimensionals to adhere the  car and the banner sentiment to the card front as in images
  7. Glue a 5cm length of the Early Espresso Faux Suede Trim to the bottom left of the car and banner the ends
Such a simple card to put together with such a nice result. I really love all these elements in the suite. It is very easy to make a card.


Please click on the link below to head to the next blog hop for more inspiration!


Thanks for stopping by my blog today. You are appreciated!
Product List
Paper Snips
[103579]
$19.25

Wednesday 14 September 2022

Around the World on Wednesday Blog Hop - It's a Wonderful Day in the Neighborhood


Hello and welcome to the Around the World on Wednesday Blog Hop for September.

Each month a wonderful creative group of friends get together from all over the world and create to a common theme. Below is an image showing where we all live across the globe. I am from NSW on the south east coast of Australia.


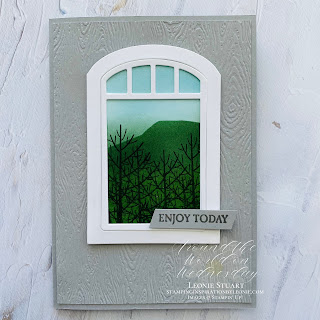
This months theme is It's a Wonderful Day in the Neighbourhood! Well.......... let me tell you it is a cracking day in our neighbourhood as I sit and write my blog post. I have just popped out on my patio for the photo below. Today is the perfect spring day and the photo is what I love most about my neighbourhood....my view of Woodhill Mountain, Berry. We built this home and moved in just over 2 years ago. We purchased this land for the incredible view of the mountain. A similar view that I had from my parents kitchen window when I was younger. The trees and mountain always lift my spirit. 


So for my card I wanted to recreate this view from my kitchen window using the beautiful Window Wishes Bundle.


  1. Start with a Smokey Slate card base measuring 21cm x 14.9cm scored and folded in half
  2. Cut another piece of Smokey Slate card stock to measure 10cm x 14.3cm and run this through the Cut & Emboss machine using the Timber 3D Embossing Folder. Adhere this to the card font using glue
  3. Die cut the window frame and insert from Basic White card stock and set aside
  4. Cur a piece of Basic White card stock to measure 2 1/2" x 5". Using Blending Brushes create a sky with Balmy Blue ink and the mountain and foreground with Evening Evergreen and Garden Green ink
  5. Cut some masking Paper into the shape of the horizon that you would like. I wanted the mountain in the background. Adhere this to the blended ink piece of card stock and blend the greens to create the mountain or horizon
  6. Stamp the trees in the foreground with Evening Evergreen ink
  7. Glue the window pieces to the top of the blended scene. Trim the excess card stock from around the window edges. Pop this all up on Dimensionals and adhere to the card front
  8. Stamp the sentiment in Basic Gray ink on Smokey Slate card stock and use snips to trim and Dimensionals to adhere to the right hand side of the window

Up next is the amazing RocheLaird-Smith.
Please click on the next blog button below to head to her blog post as she will have something beautiful to share this month. 


Have a wonderful week!!


Product List
Paper Snips
[103579]
$19.25