

Hello and welcome to Colour INKspiration #116!
The crew would love you to join us for one of the challenges! It's so easy. Firstly, get some INKspiration by checking out all of the creations of the Colour INKspiration Crew in the challenge album on our Facebook page. Then you have 12 days from today to make and upload your creation to the Facebook Colour INKspiration Group. You don't have to have a blog to participate but if you do you can link back to your post. Make sure you use all of the challenge colours. You can also use neutrals such as Whisper White, Very Vanilla, Crumb Cake, Sahara Sand and Basic Black as well as Metallics.
Not a member of the Colour INKspiration Facebook group yet? Just click here and ask to join Colour INKspiration, add the group to your favourites and share it with your crafty friends so they can join in the fun too. Make sure that you answer the joining questions. We can't wait to see what you create with these gorgeous colours.
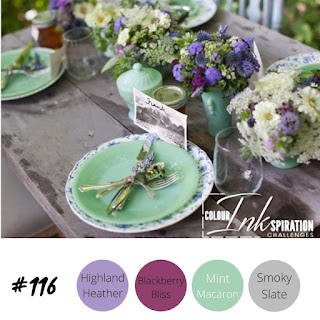
This months inspiration image was chosen by lovely crew member Cheryl Miller. A gorgeous table setting in the countryside. Wouldn't you just love to be sitting there enjoying a meal with friends.
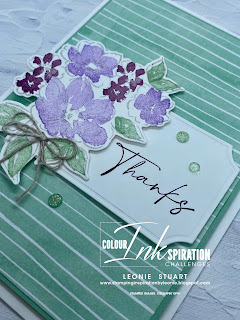
For this challenge I have chosen the coordinating Hand Penned Petals Bundle and Hand Penned Designer Series Paper.
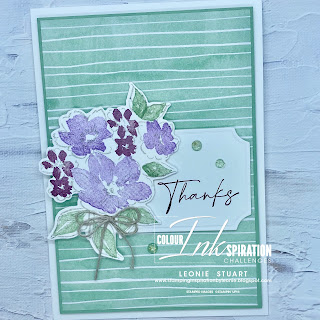
- Start with a Basic White card base measuring 21cm x 14.9cm scored and folded in half
- Cut a piece of Mini Macaron card stock to measure 9.7cm x 14cm
- Cut a piece of the DSP to measure 9.5cm x 13.8cm and glue this to the Mint Macaron matte layer and pop it up on the card front using Dimensionals
- On a piece of Basic White card stock stamp the floral image in Smokey Slate. Then colour with coordinating stamps in Highland Heather, Blackberry Bliss and Mint Macaron. Die cut using the coordinating die
- Die cut the label in Basic White card stock using the label from the Painted Labels Dies
- Stamp the Sentiment in Blackberry Bliss on the bottom right hand corner
- Adhere the sentiment layer to the card front using Dimensionals
- Adhere the floral layer to the left hand side of the sentiment layer using Dimensionals
- Cut a 15cm length of Linen Thread and create a double bow. adhere it to the bottom of the flowers using a Glue Dot
- Adhere three of the Mint Macaron Genial Gems around the floral image
Many thanks for stopping by today. You are appreciated.
Have a fabulous week!

 |  |  | ||
 |  |  | ||
 |  |  |  |  |
 |  |
")
 Designer Series Paper")


")
 Designer Series Paper")


 Cotton Ribbon Combo Pack")


")


